Delphi Programming / Object Pascal
  
[掲載 2009年06月24日] [更新 2013年12月19日] エクセル操作フォームEx |
エクセル操作フォームEx 参考コード類
帳票の図を挿入して表示 |
| 動作確認等 |
Windows 7 U64(SP1) + Delphi XE Pro + Excel 2010 |
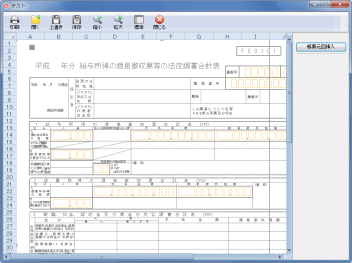
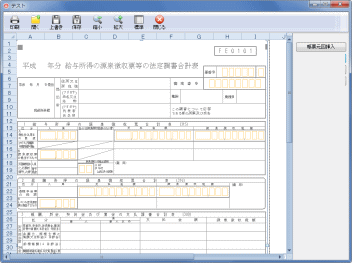
エクセルを帳票入力として使用する場合、元の帳票を表示すれば、入力の設計がやりやすくなることがあります。画像や図は、メタファイルを Pictures オブジェクトの Insert メソッドで挿入すると、元の図のサイズで表示してくれますが、ワードとは違い、実際に利用するには、トリミングや余白も適切に設定する作業が必要です。
また、使用するプリンタの解像度で DocuWorks に出力したり、[スプールファイル変換ツール] 等で印刷結果を確認することも必要です。このテストプログラムで使用したメタファイルは、A4 縦の寸法を指定して作成したメタフィルです。
画像や図が表示されている部分は、セルをクリックしても図が選択されてしまいます。入力位置への移動は、カーソル移動キーを使用するか、指定セルをアクティブ化します。 |
 |
図1
図を挿入 |
 |
図2
トリミングやサイズを設定 |
 |
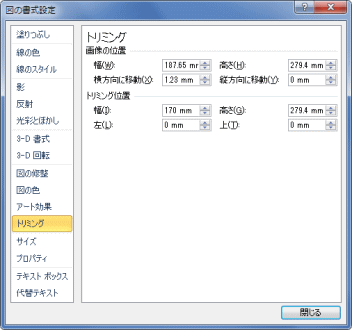
図3
図の書式設定ダイアログ
- 図のポップアップメニューから
[図の書式設定] を選択して表示
- トリミング、位置やサイズを設定する
|
unit ExcelTestForm;

interface

uses
  Windows, Messages, SysUtils, Variants, Classes, Graphics, Controls, Forms,
  Dialogs, Buttons, StdCtrls, plExcelEx, ToolWin, ComCtrls, ExtCtrls, Spin,
  Excel2000;

type
  TplExcelFormEx1 = class(TplExcelFormEx)
    Button1: TButton;
    Button2: TButton;
    Button3: TButton;
    Button4: TButton;
    procedure FormShow(Sender: TObject);
    procedure FormCloseQuery(Sender: TObject; var CanClose: Boolean);
    procedure Button1Click(Sender: TObject);
  private
    { Private 宣言 }
    AShapeRange : Excel2000.ShapeRange;
  public
    { Public 宣言 }
  end;

var
  plExcelFormEx1: TplExcelFormEx1;

implementation

uses Office2000;

{$R *.dfm}

//=============================================================================
//  フォーム表示開始時の処理
//=============================================================================
procedure TplExcelFormEx1.FormShow(Sender: TObject);
begin
  //フォーム表示開始時に開くブック名
  xlfBookFullPath := 'テスト.xls';
  //行列番号を表示する
  xlfDisplayHeadings := True;

  //元のOnShowもを実行
  inherited;
end;

//=============================================================================
//  フォームを閉じる時の処理
//=============================================================================
procedure TplExcelFormEx1.FormCloseQuery(Sender: TObject;
  var CanClose: Boolean);
begin
  AShapeRange := nil;

  Self.xlfBookSaved := True;
  inherited;
end;

//=============================================================================
//  帳票の元図をエクセルに表示
//  PicturesオブジェクトのInsertメソッドを使用すると元のサイズで挿入可能
//=============================================================================
procedure TplExcelFormEx1.Button1Click(Sender: TObject);
var
  AFileName : WideString;
  APictures : Excel2000.Pictures;
  APicture  : Excel2000.Picture;
  AName     : WideString;
begin
  AFileName := ExtractFilePath(Application.ExeName) + '法定調書合計表.emf';

  APictures   := Excel2000.Pictures(xlfExcelSheet.Pictures);
  AShapeRange := APictures.Insert(AFileName,EmptyParam).ShapeRange;

  //縦横比を保つか
  //テストなのでFalseにしてみる
  AShapeRange.LockAspectRatio := msoFalse;

  AShapeRange.Left := 0;
  AShapeRange.Top  := 0;
  //図形の名前
  AName := AShapeRange.Name;

  //この名前のShapeオブジェクトを自由移動可能とする
  AShapeRange.Item(AName).Placement := xlFreeFloating;

  //図形のPictureオブジェクト
  APicture := APictures.Item(AName) as Excel2000.Picture;
  //印刷しない(デフォルトでTrueなので指定しなければ印刷する)
  APicture.PrintObject := False;
end;
| 挿入した画像や図は Delete メソッドで削除できます。 |
procedure TplExcelFormEx1.Button5Click(Sender: TObject);
begin
  if AShapeRange <> nil then begin
    AShapeRange.Delete;
  end;
end;
| 図の書式設定ダイアログを表示して位置やサイズを設定 |
[図の書式設定] ダイアログは、以下のようにコントロール ID を使用しても表示できます。
AShapeRange は上のサンプルの画像のオブジェクトです。 |
procedure TplExcelFormEx1.Button2Click(Sender: TObject);
var
  objExcelApp : OleVariant;
begin
  if AShapeRange <> nil then begin
    AShapeRange.Select(EmptyParam);
    objExcelApp := xlfExcelApp.Application;
    try
      objExcelApp.CommandBars.ExecuteMso('ObjectSizeAndPositionDialog');
    except
    end;
  end else begin
    //
  end;
end;
| 画像のコントラストや明るさの調整には、PictureFormat オブジェクトが使用できます。 |
procedure TplExcelFormEx1.Button3Click(Sender: TObject);
var
  AFileName      : WideString;
  APictures      : Excel2000.Pictures;
  APictureFormat : Excel2000.PictureFormat;
begin
  AFileName := ExtractFilePath(Application.ExeName) + '法定調書合計表.emf';

  APictures   := Excel2000.Pictures(xlfExcelSheet.Pictures);
  AShapeRange := APictures.Insert(AFileName,EmptyParam).ShapeRange;

  APictureFormat := AShapeRange.PictureFormat as Excel2000.PictureFormat;
  APictureFormat.ColorType  := msoPictureGrayscale;
  APictureFormat.Brightness := 0.7;
  APictureFormat.Contrast   := 0.15;

  //元の図(画像)に透明部分があればその部分を透過する
  (AShapeRange.Fill as FillFormat).Visible := msoFalse;
end;
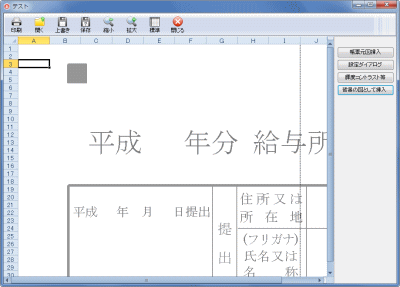
画像を背景として挿入すれば、セルのクリックで画像や図が選択されることはありません。
ただしこの場合、その画像や図の元の幅と高さで挿入されます。この値はビットマップの場合はピクセル値です。下図は、上で使用した同じメタファイルを挿入した例です。このままでは実用になりません。実際には解像度に合わせたサイズの図を作成してから挿入することになります。 |
 |
図4
図を背景に挿入 |
procedure TplExcelFormEx1.Button4Click(Sender: TObject);
var
  AFileName : WideString;
begin
  AFileName := ExtractFilePath(Application.ExeName) + '法定調書合計表.emf';
  xlfExcelSheet.SetBackgroundPicture(AFileName);
end;
| 背景の画像は、空の画像ファイル名を指定すれば削除できます。 |
procedure TplExcelFormEx1.Button5Click(Sender: TObject);
begin
  xlfExcelSheet.SetBackgroundPicture('');
end;
|


