Delphi Programming / Object Pascal
  
[掲載 2012年07月26日] [更新 2013年07月11日] Delphi サンプルプログラム集 |
| 192_線の端点形状の変更と GDI+ |
| 動作確認等 |
Windows 7 U64(SP1) + Delphi XE(UP1) Pro |
 |
192_GDIplusBasic.zip [1,241 KB] 2012年07月26日版 (EXE 同梱) |
GDI+ の機能を利用すると、[190_線の端点形状と接合スタイル] と同じ動作のプログラムが比較的簡単なコードで実現できます。
GDI+ は Windows XP で実装されたグラフィクスサブシステムで、従来の GDI の拡張版です。
Delphi XE 以前で GDI+ の機能をするには、GDI+ を利用するためのライブラリが必要です。以下の [GDI+ 関係サンプル 概要] の記事を参考にしてください。Delphi XE2 には実装されています。
|
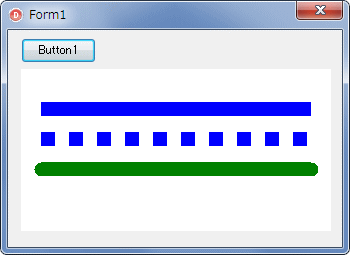
実線の両端をフラットにして描画します。従来の GDI ですと、丸になりますが、GDI+ のデフォルトはこのフラットです。
太い点線、一転鎖線等も描画できます。一番下は始点と終点を丸にしています。 |
 |
図1
実行結果
|
unit Unit1;

interface

uses
  Windows, Messages, SysUtils, Variants, Classes, Graphics, Controls, Forms,
  Dialogs, StdCtrls, ExtCtrls;

type
  TForm1 = class(TForm)
    Button1: TButton;
    Image1: TImage;
    procedure Button1Click(Sender: TObject);
  private
    { Private 宣言 }
  public
    { Public 宣言 }
  end;

var
  Form1: TForm1;

implementation

uses GDIPAPI, GDIPOBJ;

{$R *.dfm}

//=============================================================================
//  GDI+ Libraryを使用した描画
//  線の端点形状を変更
//=============================================================================
procedure TForm1.Button1Click(Sender: TObject);
var
  Graphics : TGPGraphics;
  Pen      : TGPPen;
begin
  Image1.Picture.Assign(nil);

  //描画はImage1のCanvasとする。このオブジェクトを取得
  Graphics := TGPGraphics.Create (Image1.Canvas.Handle);

  //最初の線の色
  Pen := TGPPen.Create(MakeColor(255, 0, 0, 255), 14);
  try
    //1番目の線
    Graphics.DrawLine(Pen, 20, 40, Image1.Width - 20, 40);


    //2番目の線
    //色は前と同じとするので設定なし、線のスタイルをドットに
    Pen.SetDashStyle(DashStyleDot);
    Graphics.DrawLine(Pen, 20, 70, Image1.Width - 20, 70);


    //3番目の線の色とスタイル
    Pen.SetColor (aclGreen);
    Pen.SetDashStyle(DashStyleSolid);

    //3番目の線の描画開始端と終了端の形状を丸に
    Pen.SetStartCap (LineCapRound);
    Pen.SetEndCap   (LineCapRound);
    Graphics.DrawLine(Pen, 20, 100, Image1.Width - 20, 100);
  finally
    Graphics.Free;
    Pen.Free;
  end;
end;

end.
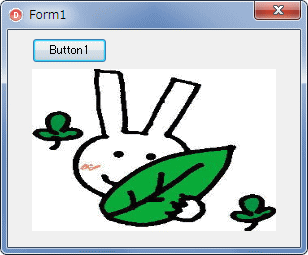
| GDI+ を使用して、ビットマップを TImag eに描画する簡単なサンプルです。 |
 |
図2
実行画面
|
unit Unit1;

interface

uses
  Windows, Messages, SysUtils, Variants, Classes, Graphics, Controls, Forms,
  Dialogs, StdCtrls, ExtCtrls;

type
  TForm1 = class(TForm)
    Button1: TButton;
    Image1: TImage;
    procedure Button1Click(Sender: TObject);
  private
    { Private 宣言 }
  public
    { Public 宣言 }
  end;

var
  Form1: TForm1;

implementation

uses GDIPAPI, GDIPOBJ;

{$R *.dfm}

//=============================================================================
//  GDI+ Libraryを使用した描画
//  ビットマップ画像の表示
//=============================================================================
procedure TForm1.Button1Click(Sender: TObject);
var
  Graphics : TGPGraphics;
  Bmp      : TGPBitmap;
  Rect     : TGPRect;
begin
  Image1.Picture.Assign(nil);

  //描画はImage1のCanvasとする。このオブジェクトを取得
  Graphics := TGPGraphics.Create (Image1.Canvas.Handle);
  //描画するビットマップ
  Bmp := TGPBitmap.Create ('001.bmp');

  try
    //描画先の矩形領域
    Rect := MakeRect(0, 0, Image1.Width, Image1.Height);
    //Image1の指定範囲にビットマップを描画
    Graphics.DrawImage(Bmp, Rect);
  finally
    Graphics.Free;
    Bmp.Free;
  end;
end;

end.
|

