|
Delphi Programming / Object Pascal
  
[掲載 2012年11月07日] [更新 2017年05月01日] GDI+ 関係サンプル |
GDI+ 関係サンプル
G010_Pen, Color, Brush |
| 動作確認等 |
Windows 7 U64(SP1) + Delphi XE(UP1) Pro |
 |
G010_GDIPlus_PenColorBrush.zip [5,871 KB] 2017年05月01日版 (EXE 同梱) |
ペンは線の形状,太さ,色等を設定する場合に使用します.
他の GDI+ のオブジェクト同様,Create 関係でそのインスタンスを生成します.属性は,Delphi の VCL のような,プロパティへの代入方式ではなく,Windows API の他の関数と同じように,関数類で設定します.
実際に描画するには,TGPGraphics のインスタンスを生成し,TGPGraphics の関数あるいはメソッド類を使用します.関数によっては,引数でペン関係の設定ができるものもあります.
次のコードは,TGPPen オブジェクトのいろいろな使用方法を示すために,いろいろな設定で 5 本の直線を DrawLine 関数で描画するものです.
GDI+ の色は,次のように,MakeColor でも設定できます. |
TGPPen.SetColor(MakeColor(255, 0, 0, 0));
| MakeColor に相当する VCL の色の設定は RGB 関数です.アルファ値の指定はできません. |
procedure TForm1.Button1Click(Sender: TObject);
var
  LColor : TColor;
begin
  LColor := RGB(255, 0, 0);
  Self.Color := LColor;
end;
[備考]
連続した直線は TGPGraphic.DrawLines で描画できます.
パスの場合は TGPGraphicsPath.AddLines で作成できます.座標値の配列を使用する場合は以下の記事を参考にしてください.静的配列の使用例と動的配列の使用法の説明があります.
|
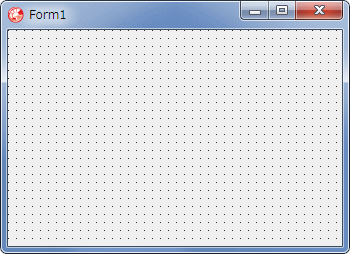 |
図1
設計時画面 |
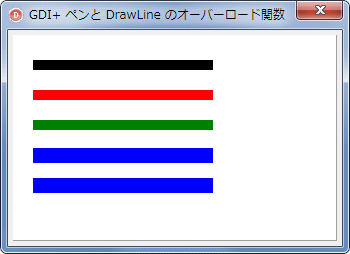 |
図2
DrawLine 関数で直線を描く |
unit Unit1;

interface

uses
  Windows, Messages, SysUtils, Classes, Graphics, Controls, Forms, Dialogs,
  ExtCtrls, StdCtrls, GDIPAPI, GDIPOBJ;

type
  TMyPanel = class(TPanel)
  protected
    procedure Paint; override;
  end;

  TForm1 = class(TForm)
    procedure FormCreate(Sender: TObject);
  private
    { Private 宣言 }
    MyPanel : TMyPanel;
  public
    { Public 宣言 }
  end;

var
  Form1: TForm1;

implementation

{$R *.DFM}

//=============================================================================
//  フォーム生成時の処理
//=============================================================================
procedure TForm1.FormCreate(Sender: TObject);
begin
  Caption := 'GDI+ ペンと DrawLine のオーバーロード関数';

  //TMyPanelを生成して配置
  MyPanel := TMyPanel.Create(Self);
  with MyPanel do begin
    Parent  := Self;
    Left    := 5;
    Top     := 5;
    Width   := Self.ClientWidth  - 10;
    Height  := Self.ClientHeight - 10;
    Anchors := [akLeft, akTop, akRight, akBottom];
    Color   := clWhite;
    ParentBackground := False;
    DoubleBuffered   := True;
  end;
end;

{ TMyPanel }

//-----------------------------------------------------------------------------
//  TMyPanelクラスのPaintメソッド
//  実際の描画コード
//
//  ペンの指定と DrawLine のオーバーロード関数類
//  DrawLine メソッドには 4 つの overload 関数がある
//  単に引数の数の違いではなく,型を間違えるとコンパイル時にエラーとなる
//
//  座標は,整数指定の TGPPoint と実数指定の TGPPointF がある
//-----------------------------------------------------------------------------
procedure TMyPanel.Paint;
var
  LGPGraphic : TGPGraphics;
 LGPPen     : TGPPen;
  LP1        : TGPPoint;
  LP2        : TGPPoint;
begin
  inherited;

  //ペンのオブジェクトを生成
  //ペンの初期値の色は必ず指定する.太さは省略すると1
  LGPPen := TGPPen.Create(aclBlack, 10);
  //TGPGraphicsオブジェクトを生成する
  LGPGraphic := TGPGraphics.Create(Canvas.Handle);


  //1本目の直線
  LGPGraphic.DrawLine(LGPPen, 20, 30, 200, 30);


  //2本目の直線
  //色を変更
  LGPPen.SetColor(aclRed);
  LGPGraphic.DrawLine(LGPPen, 20.0, 60.0, 200.0, 60.0);


  //3本目の直線
  //色をVCLのTColorで変更
  //ColorRefToARGB関数でGDI+の色に変紺
  //描画座標値をポイントで指定
  //ポイントはMakePoint関数を使用する.整数指定の場合
  LGPPen.SetColor(ColorRefToARGB(clGreen));
  LGPGraphic.DrawLine(LGPPen, MakePoint(20, 90), MakePoint(200, 90));


  //4本目の直線
  //色と線の太さを変更
  //16進数で指定.先頭の1バイトはアルファ値
  //描画座標値をポイントで指定
  //ポイントはMakePoint関数を使用する.実数指定の場合
  LGPPen.SetColor($FF0000FF);
  LGPPen.SetWidth(15);
  LGPGraphic.DrawLine(LGPPen, MakePoint(20.0, 120.0), MakePoint(200.0, 120.0));


  //5本目の直線
  //描画座標値をポイントで指定
  LP1 := MakePoint(20,  150);
  LP2 := MakePoint(200, 150);
  LGPGraphic.DrawLine(LGPPen, LP1, LP2);

  //Createしたオブジェクトは解放処理する
  LGPPen.Free;
  LGPGraphic.Free;
end;

end.
GDI+ では各ピクセルの色として,赤,緑,青,およびアルファそれぞれに 8 ビットずつを割り当てた 32 ビットの数値を使用します.ARGB 形式とも言っています.4 つの各要素は、0 から 255 までの数値です.0 は輝度がないことを意味し,255 であれば輝度が最大となります.アルファ値は,色の透明度で,0 は完全な透明,255 は完全な不透明です.
32 ビットの先頭の 1 バイトがアルファ値で,続いて R(赤),G(緑),B(青)の順となっています.定数名は VCL の色の定数名の前にアルファを意味する 'a' を付けると GDI+ の色定数になります.
このテストでは,後から描く直線の色の,先頭のバイト値を変更して半透明にしています. |
[備考]
Direct2D の色の指定は,アルファ値,R, G, B の順で,各々の値は 0 から 1 の単精度実数です. |
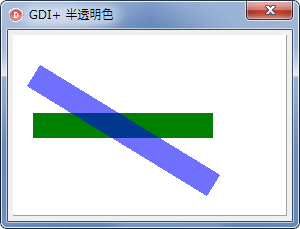 |
図3
実行画面
|
unit Unit1;

interface

uses
  Windows, Messages, SysUtils, Classes, Graphics, Controls, Forms, Dialogs,
  ExtCtrls, StdCtrls, GDIPAPI, GDIPOBJ;

type
  TMyPanel = class(TPanel)
  protected
    procedure Paint; override;
  end;

  TForm1 = class(TForm)
    procedure FormCreate(Sender: TObject);
  private
    { Private 宣言 }
    MyPanel : TMyPanel;
  public
    { Public 宣言 }
  end;

var
  Form1: TForm1;

implementation

{$R *.DFM}

//=============================================================================
//  フォーム生成時の処理
//=============================================================================
procedure TForm1.FormCreate(Sender: TObject);
begin
  Caption := 'GDI+ 半透明色';

  //TMyPanelを生成して配置
  MyPanel := TMyPanel.Create(Self);
  with MyPanel do begin
    Parent  := Self;
    Left    := 5;
    Top     := 5;
    Width   := Self.ClientWidth  - 10;
    Height  := Self.ClientHeight - 10;
    Anchors := [akLeft, akTop, akRight, akBottom];
    Color   := clWhite;
    ParentBackground := False;
    DoubleBuffered   := True;
  end;
end;

{ TMyPanel }

//-----------------------------------------------------------------------------
//  TMyPanelクラスのPaintメソッド
//  半透明の色で直線を描く
//-----------------------------------------------------------------------------
procedure TMyPanel.Paint;
var
  LGPGraphic : TGPGraphics;
 LGPPen     : TGPPen;
begin
  inherited;

  //ペンのオブジェクトを生成
  LGPPen := TGPPen.Create(aclBlack);
  //TGPGraphicsオブジェクトを生成する
  LGPGraphic := TGPGraphics.Create(Canvas.Handle);


  //1本目の直線
  LGPPen.SetWidth(25);
  LGPPen.SetColor(aclGreen);
  LGPGraphic.DrawLine(LGPPen, MakePoint(20, 90), MakePoint(200, 90));


  //2本目の直線
  //先頭のバイト値を変更して半透明に
  LGPPen.SetColor($8F0000FF);
  LGPGraphic.DrawLine(LGPPen, MakePoint(20, 40), MakePoint(200, 150));

  //Createしたオブジェクトは解放処理する
  LGPPen.Free;
  LGPGraphic.Free;
end;

end.
| 03_GDI+ の TGPColor と VCL の TColor |
GDI+ の TGPColor の色と VCL の TColor の色には互換性はありません.VCL の TColor はアルファ値をサポートしていません.色を 16 進数で指定する際,GDI+ の TGPColorでは ARGB 順ですが,TColor の場合は BGR の順です.
これらの色は,ColorRefToARGB あるいは,ARGBToColorRef 関数を使用して相互に変換できます.その確認のテストプログラムです. |
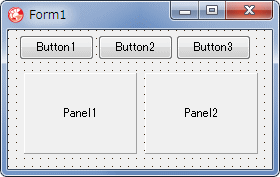 |
図4
設計時画面
- TGPColor と TColor でパネルの色を変えてみる
|
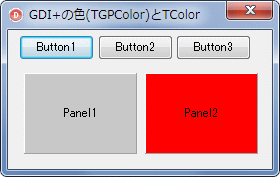 |
図5
赤を指定
- 左は aclRed
- 右は clRed
- 同じ色にはならない
|
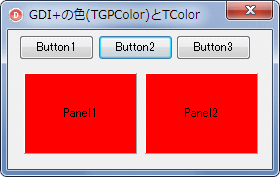 |
図6
ARGBToColorRef 関数で TColor に変換
|
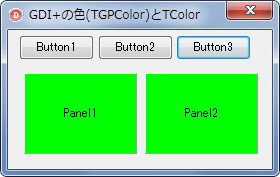 |
図7
ColorRefToARGB 関数の使用例
|
リスト3
GDI+ の TGPColor と VCL の TColor
の相互変換テスト |
unit Unit1;

interface

uses
  Windows, Messages, SysUtils, Classes, Graphics, Controls, Forms, Dialogs,
  ExtCtrls, StdCtrls, GDIPAPI, GDIPOBJ;

type
  TForm1 = class(TForm)
    Button1: TButton;
    Button2: TButton;
    Button3: TButton;
    Panel1: TPanel;
    Panel2: TPanel;
    procedure FormCreate(Sender: TObject);
    procedure Button1Click(Sender: TObject);
    procedure Button2Click(Sender: TObject);
    procedure Button3Click(Sender: TObject);
  private
    { Private 宣言 }
  public
    { Public 宣言 }
  end;

var
  Form1: TForm1;

implementation

{$R *.DFM}

//=============================================================================
//  フォーム生成時の処理
//=============================================================================
procedure TForm1.FormCreate(Sender: TObject);
begin
  Caption := 'GDI+の色(TGPColor)とTColor';

  //これがないとTPanelの色が変更できない場合がある
  Panel1.ParentBackground := False;
  Panel2.ParentBackground := False;
end;

//=============================================================================
//  GDI+ の色とTColorに互換性はない
//  GDI+ の色定数名は 先頭にaが付く(アルファ値の意味のa)
//=============================================================================
procedure TForm1.Button1Click(Sender: TObject);
var
  LGDIColor : TGPColor;
  LColor    : TColor;
begin
  LGDIColor := aclRed;
  LColor   :=  clRed;

  //GDI+ の色はARGB形式なので$FFFF0000でも同じ
  Panel1.Color := LGDIColor;
  Panel2.Color := LColor;
end;

//=============================================================================
//  ARGBToColorRef を使用するとGDI+ の色を TColorに変換できる
//=============================================================================
procedure TForm1.Button2Click(Sender: TObject);
var
  LGDIColor : TGPColor;
  LColor    : TColor;
begin
  LGDIColor := aclRed;
  LColor    :=  clRed;

  Panel1.Color := ARGBToColorRef(LGDIColor);
  Panel2.Color := LColor;
end;

//=============================================================================
//  ColorRefToARGB を使用するとTColor の値をを GDI+の色に変換できる
//=============================================================================
procedure TForm1.Button3Click(Sender: TObject);
var
  LColor : TColor;
begin
  LColor := clLime;

  Panel1.Color := ARGBToColorRef(ColorRefToARGB(LColor));
  Panel2.Color := LColor;
end;

end.
| 色の RGB の各要素の値の取得は,VCL では GetRValue 等の関数を使用しますが,GDI+ の場合,それらの関数では正しい値は取得できません.また,色の値を 16 進数で指定する場合はそのまま ARGB の順で指定できます.VCL の場合は BGR の順になっています. |
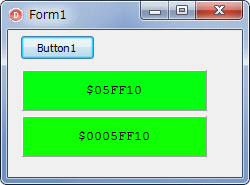 |
図8
GDI+ における色の各要素の取得例 |
リスト4
GDI+ における色の各要素の取得例.VCL との比較 |
implementation

uses
  GDIPAPI, GDIPOBJ;

{$R *.dfm}

procedure TForm1.Button1Click(Sender: TObject);
var
  LColor   : TColor;
  LGPColor : TGPColor;
  LAValue  : Byte;
  LRValue  : Byte;
  LGValue  : Byte;
  LBValue  : Byte;
  LText    : string;
begin
  //-----------------------------------------------------
  //  VCL(GDI)の色の各要素の値の取得
  //  BGRの順になっている
  //  実際は4fバイトであるが先頭バイトは特別なフラグ
  //-----------------------------------------------------
  LColor := $10FF05;

  LRValue := GetRValue(LColor);
  LGValue := GetGValue(LColor);
  LBValue := GetBValue(LColor);

  LText := '$' + IntToHex(LRValue, 2) + IntToHex(LGValue, 2) + IntToHex(LBValue, 2);

  Panel1.ParentBackground := False;

  Panel1.Color   := LColor;
  Panel1.Caption := LText;


  //-----------------------------------------------------
  //  GDI+の色の各要素の値の取得
  //  ARGBの順になっている
  //  VCL(GDI)とは取得に使用する関数違うので注意
  //  透明の指定にしているが透明にはならない
  //  透明半透明で描画するにはGDI+のメソッド類を使用する
  //-----------------------------------------------------
  LGPColor := $0005FF10;

  LAValue := GetAlpha(LGPColor);
  LRValue := GetRed(LGPColor);
  LGValue := GetGreen(LGPColor);
  LBValue := GetBlue(LGPColor);

  LText := '$' + IntToHex(LAValue, 2)
         + IntToHex(LRValue, 2) + IntToHex(LGValue, 2) + IntToHex(LBValue, 2);

  Panel2.ParentBackground := False;

  Panel2.Color   := LGPColor;
  Panel2.Caption := LText;

end;
最初のサンプルプログラムで,直線を描く関数,DrawLine を使用していますが,この関数には引数の数と型が異なる複数の関数,オーバーロード関数があります.引数の型を間違えると,
「指定された引数で呼び出すことのできるオーバーロード関数 'DrawLine' が定義されていません」
と言うエラーが発生して,コンパイルできません.
GDI+ の関数には,このようにオーバーロード関数が多くあります.注意が必要です.例えば 領域を設定するTGPRect は整数型,末尾に F (Float の F の意味と思われる) が付く TPGRectF は実数で指定します.実数の場合,小数点以下も指定しないと整数と見なされてしまいます. |
  //エラーにはならない
  LGPGraphic.DrawLine(LGPPen, MakePoint(20, 90), MakePoint(200, 90));
  //エラーとなる
  LGPGraphic.DrawLine(LGPPen, MakePoint(20.0, 90.0), MakePoint(200, 90));
GDI+ の Brush(ブラシ) は,VCL の Canvas の Brush より遥かに機能が豊富です.GDI+ の Brush は図形でも文字列でも使用します.
- SolidBrush (ソリッドブラシ 型は TGPSolidBrush)
- HatchBrush (ハッチブラシ 型は TGPHatchBrush)
- LinearGradientBrush (リニアグラデーションブラシ 型は TGPLinearGradientBrush)
- TextureBrush (テクスチャブラシ 型は TGPTextureBrush)
- PathGradientBrush (パスブラシ 型は TGPPathGradientBrush)
の 5 種類があります.
PathGradientBrush はパスの図形専用ですが,その他は,文字列,図形のどちらでも使用できます.
最初は,ソリッドブラシのテストサンプルです.
ソリッドブラシは単に図形の内部を塗潰すだけです.オブジェクトのインスタンス作成時に色を指定できますが,TGPPen 等,他のオブジェクトと同じように,色を指定する別の関数もあります.
次のサンプルはこの TGPSolidBrush 簡単なテストプログラムです. |
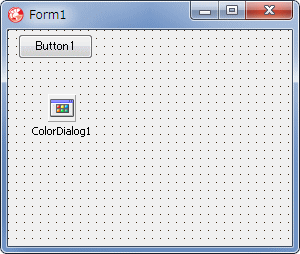 |
図9
設計時画面
|
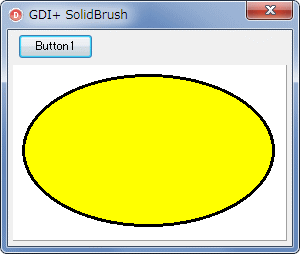 |
図10
ソリッドブラシ
|
unit Unit1;

interface

uses
  Windows, Messages, SysUtils, Classes, Graphics, Controls, Forms, Dialogs,
  ExtCtrls, StdCtrls, GDIPAPI, GDIPOBJ;

type
  TMyPanel = class(TPanel)
  protected
    procedure Paint; override;
  public
    FBrushColor : Cardinal;
  end;

  TForm1 = class(TForm)
    Button1: TButton;
    ColorDialog1: TColorDialog;
    procedure FormCreate(Sender: TObject);
    procedure Button1Click(Sender: TObject);
  private
    { Private 宣言 }
    MyPanel : TMyPanel;
  public
    { Public 宣言 }
  end;

var
  Form1: TForm1;

implementation

{$R *.DFM}

//=============================================================================
//  フォーム生成時の処理
//=============================================================================
procedure TForm1.FormCreate(Sender: TObject);
begin
  Caption := 'GDI+ SolidBrush';

  //TMyPanelを生成して配置
  MyPanel := TMyPanel.Create(Self);
  with MyPanel do begin
    Parent  := Self;
    Left    := 5;
    Top     := 35;
    Width   := Self.ClientWidth  - 10;
    Height  := Self.ClientHeight - Top - 5;
    Anchors := [akLeft, akTop, akRight, akBottom];
    Color   := clWhite;
    ParentBackground := False;
    DoubleBuffered   := True;

    FBrushColor := aclYellow;
  end;
end;

//=============================================================================
//  ブラシの色を変更する
//=============================================================================
procedure TForm1.Button1Click(Sender: TObject);
begin
  ColorDialog1.Color := ARGBToColorRef(MyPanel.FBrushColor);
  if ColorDialog1.Execute then begin
    MyPanel.FBrushColor := ColorRefToARGB(ColorDialog1.Color);
  end;
  MyPanel.Invalidate;
end;

{ TMyPanel }

//-----------------------------------------------------------------------------
//  TMyPanelクラスのPaintメソッド
//  実際の描画コード
//  単色のブラシの設定例
//-----------------------------------------------------------------------------
procedure TMyPanel.Paint;
var
  LGPGraphic : TGPGraphics;
 LGPPen     : TGPPen;
  LGPBrush   : TGPSolidBrush;
  LGPRect    : TGPRect;
begin
  inherited;

  //ペンのオブジェクトを生成
  LGPPen := TGPPen.Create(aclBlack, 3);
  //TGPSolidBrushを生成
  LGPBrush := TGPSolidBrush.Create(FBrushColor);

  //描画領域を指定
  LGPRect := MakeRect(10, 10, 250, 150);

  //TGPGraphicsオブジェクトを生成
  LGPGraphic := TGPGraphics.Create(Canvas.Handle);
  //内部を塗りつぶす
  LGPGraphic.FillEllipse(LGPBrush, LGPRect);
  //周囲の枠線を描画
  //線の描画関係の関数名はDrawXXXX
  LGPGraphic.DrawEllipse(LGPPen, LGPRect);

  //Createしたオブジェクトは解放処理する
  LGPPen.Free;
  LGPBrush.Free;
  LGPGraphic.Free;
end;

end.
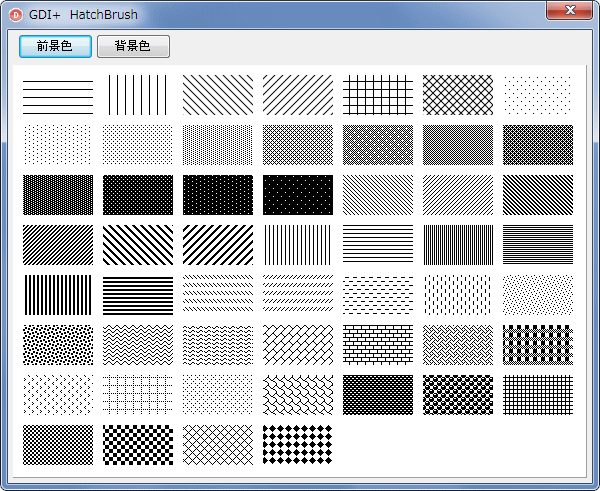
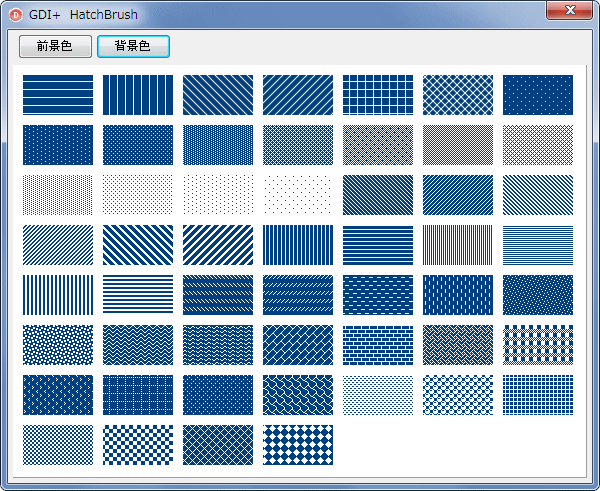
GDI+ のハッチブラシに相当するのは,VCL の TBrush の Style プロパティです.VCL の Brush スタイルは 8 種類しかありませんが,GDI+ のハッチブラシは 53 種類もあります.
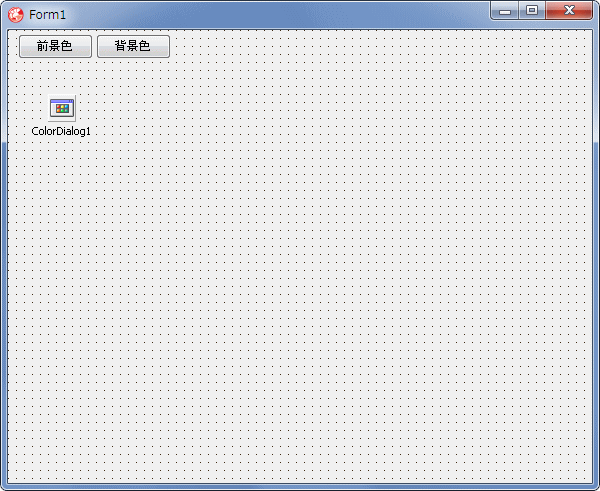
次のサンプルは,これら全ての HatchBrush を描画します.「前景色」はハッチの線の色で,背景色は背景の塗潰しの色です.これらの色を変更するだけでも印象が変化するものです
このサンプルの TMyPanel では,前景色と背景色の変数 FFrontColorと FBackColor
を定義していますが,実用的にはプロパティにすべきでしょう. |
- 図13
- 前景色と背景色を変えるだけでも印象が違ってくる
|
 |
unit Unit1;

interface

uses
  Windows, Messages, SysUtils, Classes, Graphics, Controls, Forms, Dialogs,
  ExtCtrls, StdCtrls, GDIPAPI, GDIPOBJ;

type
  TMyPanel = class(TPanel)
  protected
    procedure Paint; override;
  public
    FFrontColor : Cardinal;
    FBackColor  : Cardinal;
  end;

  TForm1 = class(TForm)
    Button1: TButton;
    ColorDialog1: TColorDialog;
    Button2: TButton;
    procedure FormCreate(Sender: TObject);
    procedure Button1Click(Sender: TObject);
    procedure Button2Click(Sender: TObject);
  private
    { Private 宣言 }
    MyPanel : TMyPanel;
  public
    { Public 宣言 }
  end;

var
  Form1: TForm1;

implementation

{$R *.DFM}

//=============================================================================
//  フォーム生成時の処理
//=============================================================================
procedure TForm1.FormCreate(Sender: TObject);
begin
  Caption := 'GDI+  HatchBrush';

  //TMyPanelを生成して配置
  MyPanel := TMyPanel.Create(Self);
  with MyPanel do begin
    Parent  := Self;
    Left    := 5;
    Top     := 35;
    Width   := Self.ClientWidth  - 10;
    Height  := Self.ClientHeight - Top - 5;
    Anchors := [akLeft, akTop, akRight, akBottom];
    Color   := clWhite;
    ParentBackground := False;
    DoubleBuffered   := True;

    FFrontColor := aclBlack;
    FBackColor  := aclWhite;
  end;
end;

//=============================================================================
//  前景色を変更してみる
//=============================================================================
procedure TForm1.Button1Click(Sender: TObject);
begin
  ColorDialog1.Color := ARGBToColorRef(MyPanel.FFrontColor);
  if ColorDialog1.Execute then begin
    MyPanel.FFrontColor := ColorRefToARGB(ColorDialog1.Color);
  end;
  MyPanel.Invalidate;
end;

//=============================================================================
//  背景色を変更してみる
//=============================================================================
procedure TForm1.Button2Click(Sender: TObject);
begin
  ColorDialog1.Color := ARGBToColorRef(MyPanel.FBackColor);
  if ColorDialog1.Execute then begin
    MyPanel.FBackColor := ColorRefToARGB(ColorDialog1.Color);
  end;
  MyPanel.Invalidate;
end;

{ TMyPanel }

//-----------------------------------------------------------------------------
//  TMyPanelクラスのPaintメソッド
//  実際の描画コード
//  ハッチブラシの一覧描画
//-----------------------------------------------------------------------------
procedure TMyPanel.Paint;
var
  LGPGraphic  : TGPGraphics;
  LHBStyleMax : Integer;
  LHBStyle    : HatchStyle;
  LHBBrush    : TGPHatchBrush;
  LCount      : Integer;
  LLoopX      : Integer;
  LLoopY      : Integer;
  LGPRect     : TGPRect;
begin
  inherited;

  //TGPGraphicsオブジェクトを生成
  LGPGraphic := TGPGraphics.Create(Canvas.Handle);

  //HatchStyleの数.全部で53ある
  LHBStyleMax := Integer(HatchStyleTotal);

  LCount := 0;
  for LLoopY := 0 to LHBStyleMax div 6 do begin
    for LLoopX := 0 to 6 do begin
       //スタイルを取得(GDIPAPI.pasに定義がある)
       LHBStyle := HatchStyle(LCount);
       //TGPHatchBrushオブジェクトを生成
       LHBBrush := TGPHatchBrush.Create(LHBStyle, FFrontColor, FBackColor);
       //描画領域の指定
       LGPRect  := MakeRect(LLoopX * 80 + 10, LLoopY * 50 + 10, 70, 40);
       //そのブラシで四角形を描く
       LGPGraphic.FillRectangle(LHBBrush, LGPRect);
       //生成したTGPHatchBrushを破棄
       LHBBrush.Free;
       if LCount >= LHBStyleMax then break;
       inc(LCount);
    end;
    if LCount >= LHBStyleMax then break;
  end;

  //Createしたオブジェクトは解放処理する
  LGPGraphic.Free;
end;

end.
リニアグラデーションのオブジェクトは,機能が豊富です.
このサンプルでは,単にグラデーションの開始色と終了色を設定し,描画方向を指定して,矩形または円を描画するものです.これだけでも豊富なバリエーションが得られるのではないでしょうか.
ネット上で,多くのサンプルを見つけることができます. |
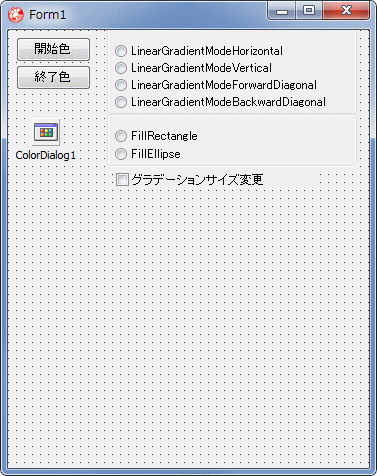 |
図14
設計時画面 |
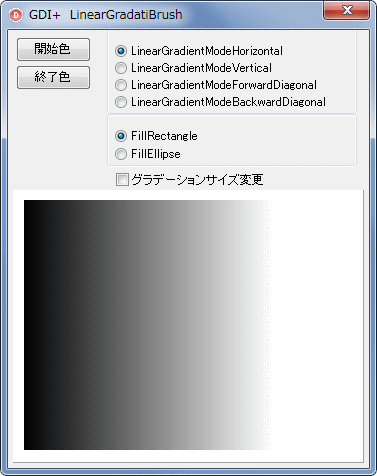 |
図15
実行開始画面 |
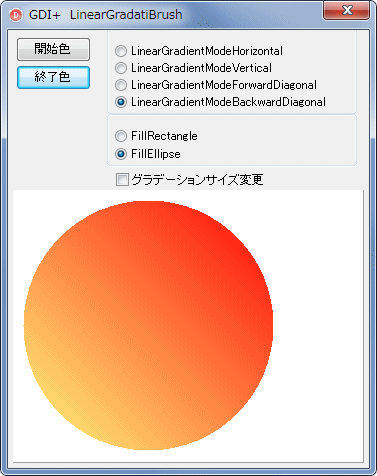 |
図16
実行画面例
- [開始色][終了色]を変更して,円の内部をグラデーションで塗潰し
|
| グラデーションは,描画する図形のクライアント領域の端から開始されるわけではありません.このサンプルでは,リニアグラデーションのオブジェクトを生成する際に,グラデーションの適用領域を指定しています.この領域が,図形の領域より小さいと,グラデーション領域のサイズで,同じグラデーションが下図のように繰り返されます. |
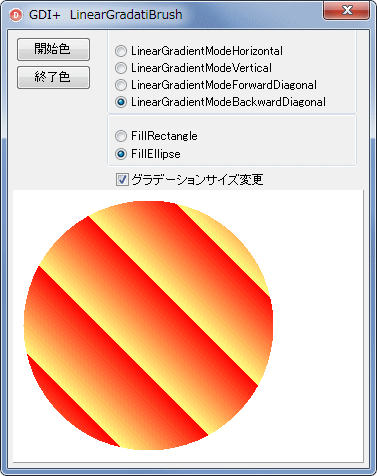 |
図17
グラデーション領域のサイズ |
このサンプルでは,TMyPanel の Paint メソッド内の最初の方で文字列を描画しています.しかし,この文字列の描画コードの後にグラデーションを描いているため,この文字列は見えません.
以下のように,色を半透明にすると見えるようになります.下の図では,開始色だけを半透明にしています.したがって,文字列の左の方が,より透けて見えています. |
  LStartColor  := ColorRefToARGB(Form1.FStartColor) and $AFFFFFFF;
  LEndColor    := ColorRefToARGB(Form1.FEndColor);
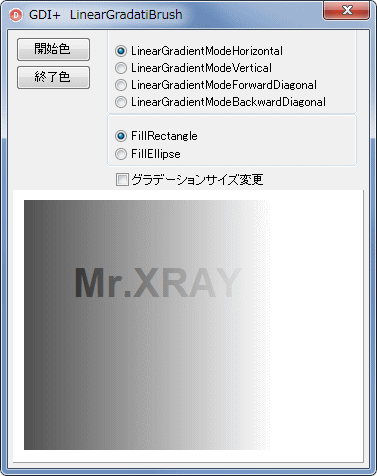 |
図18
開始色を半透明に変更 |
unit Unit1;

interface

uses
  Windows, Messages, SysUtils, Classes, Graphics, Controls, Forms, Dialogs,
  ExtCtrls, StdCtrls, GDIPAPI, GDIPOBJ;

type
  TMyPanel = class(TPanel)
  protected
    procedure Paint; override;
  end;

  TForm1 = class(TForm)
    RadioGroup1: TRadioGroup;
    CheckBox1: TCheckBox;
    RadioGroup2: TRadioGroup;
    Button1: TButton;
    Button2: TButton;
    ColorDialog1: TColorDialog;
    procedure FormCreate(Sender: TObject);
    procedure RadioGroup1Click(Sender: TObject);
    procedure CheckBox1Click(Sender: TObject);
    procedure Button1Click(Sender: TObject);
    procedure Button2Click(Sender: TObject);
  private
    { Private 宣言 }
    MyPanel    : TMyPanel;
    FStartColor : TColor;
    FEndColor   : TColor;
  public
    { Public 宣言 }
  end;

var
  Form1: TForm1;

implementation

{$R *.DFM}

//=============================================================================
//  フォーム生成時の処理
//=============================================================================
procedure TForm1.FormCreate(Sender: TObject);
begin
  Caption := 'GDI+  LinearGradatiBrush';

  //TMyPanelを生成して配置
  MyPanel := TMyPanel.Create(Self);
  with MyPanel do begin
    Parent  := Self;
    Left    := 5;
    Top     := 160;
    Width   := Self.ClientWidth  - 10;
    Height  := Self.ClientHeight - Top - 5;
    Anchors := [akLeft, akTop, akRight, akBottom];
    Color   := clWhite;
    ParentBackground := False;
    DoubleBuffered   := True;
  end;

  FStartColor := clBlack;
  FEndColor   := clWhite;

  RadioGroup1.ItemIndex := 0;
  RadioGroup2.ItemIndex := 0;
end;

//=============================================================================
//  [開始色]ボタン
//  グラデーションの開始色を設定
//=============================================================================
procedure TForm1.Button1Click(Sender: TObject);
begin
  ColorDialog1.Color := FStartColor;
  if ColorDialog1.Execute then begin
    FStartColor := ColorDialog1.Color;
  end;
  MyPanel.Invalidate;
end;

//=============================================================================
//  [終了色]ボタン
//  グラデーションの終了色を設定
//=============================================================================
procedure TForm1.Button2Click(Sender: TObject);
begin
  ColorDialog1.Color := ARGBToColorRef(FEndColor);
  if ColorDialog1.Execute then begin
    FEndColor := ColorDialog1.Color;
  end;
  MyPanel.Invalidate;
end;

//=============================================================================
//  RadioGroup1のOnClickイベント処理
//  変更したらMyPanelを再描画
//=============================================================================
procedure TForm1.RadioGroup1Click(Sender: TObject);
begin
  MyPanel.Invalidate;
end;

//=============================================================================
//  CheckBox1のOnClickイベント処理
//  変更したらMyPanelを再描画
//=============================================================================
procedure TForm1.CheckBox1Click(Sender: TObject);
begin
  MyPanel.Invalidate;
end;

{ TMyPanel }

//-----------------------------------------------------------------------------
//  TMyPanelクラスのPaintメソッド
//  実際の描画コード
//-----------------------------------------------------------------------------
procedure TMyPanel.Paint;
var
  LGPGraphic    : TGPGraphics;
  LStartColor   : TGPColor;
  LEndColor     : TGPColor;
  LGradientRect : TGPRectF;
  LCanvasRect   : TGPRectF;
  LGradientMode : TLinearGradientMode;
  LGPLinerBrush : TGPLinearGradientBrush;
begin
  inherited;

  //文字列を描画
  //実際には見えない.この後に矩形または楕円を描画してしまうので
  Canvas.Font.Name   := 'Arial';
  Canvas.Font.Style  := [fsBold];
  Canvas.Font.Height := -40;
  Canvas.TextOut(60, 70, 'Mr.XRAY');

  //RadioGroupの選択Itemによって,該当するグラデーションのオブジェクトを生成
  LGradientMode := LinearGradientModeHorizontal;
  case Form1.RadioGroup1.ItemIndex of
    0 : LGradientMode := LinearGradientModeHorizontal;
    1 : LGradientMode := LinearGradientModeVertical;
    2 : LGradientMode := LinearGradientModeForwardDiagonal;
    3 : LGradientMode := LinearGradientModeBackwardDiagonal;
  end;

  LStartColor  := ColorRefToARGB(Form1.FStartColor);
  LEndColor    := ColorRefToARGB(Form1.FEndColor);

  //グラデーションのサイズ(TGPRectF)を設定
  if Form1.CheckBox1.Checked then begin
    LGradientRect := MakeRect(10.0, 10.0, 50.0, 50.0);
  end else begin
    LGradientRect := MakeRect(10.0, 10.0, 250.0, 250.0);
  end;
  //リニアグラデーションのオブジェクトを生成
  LGPLinerBrush := TGPLinearGradientBrush.Create(
                          LGradientRect,
                          LStartColor,
                          LEndColor,
                          LGradientMode);

  //TGPGrahicsのオブジェクトを生成
  LGPGraphic  := TGPGraphics.Create(Canvas.Handle);

  //描画領域の矩形範囲を設定
  LCanvasRect := MakeRect(10.0, 10.0, 250.0, 250.0);
  //描画実行
  case Form1.RadioGroup2.ItemIndex of
    0: LGPGraphic.FillRectangle(LGPLinerBrush, LCanvasRect);
    1: LGPGraphic.FillEllipse(LGPLinerBrush, LCanvasRect);
  end;

  //Createしたオブジェクトは解放処理する
  LGPLinerBrush.Free;
  LGPGraphic.Free;
end;

end.
TGPLinearGradientBrush の関数 SetInterpolationColors を使用した例です.
このコードでは,4 つの色を指定し,その色の間で連続的なグラデーションを描いています. |
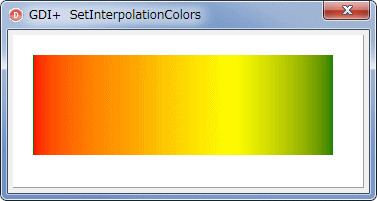 |
図19
SetInterpolationColors |
リスト9
SetInterpolationColors
関数の使用例 |
//-----------------------------------------------------------------------------
//  TMyPanelクラスのPaintメソッド
//  実際の描画コード
//-----------------------------------------------------------------------------
procedure TMyPanel.Paint;
const
  Colors : array[0..3] of TGPColor = (aclRed, aclOrange, aclYellow, aclGreen);
var
  LGPGraphicgr : TGPGraphics;
  LGPBrush     : TGPLinearGradientBrush;
  LPositions   : array[0..3] of Single;
  i            : Integer;
begin
  inherited;

  //TGPLinearGradientBrushのオブジェクトを生成
  //範囲は後で描画する四角形と同じとする
  LGPBrush := TGPLinearGradientBrush.Create(MakePoint(20, 0),
                                           MakePoint(320, 0),
                                           aclDarkOliveGreen,
                                           aclYellow);

  //色を変化させる位置を配列にセットして...
  for i :=0 to Length(Colors) - 1 do begin
    LPositions[i] := 1 / (Length(Colors) - 1) * i;
  end;
  //ブラシオブジェクトに,色の情報とその変化位置を格納
  LGPBrush.SetInterpolationColors(@Colors[0], @LPositions[0], Length(Colors));
  //ガンマ補正の指定
  LGPBrush.SetGammaCorrection(True);

  //TGPGraphicsオブジェクトを生成して,四角形内部をブラシで塗潰す
  LGPGraphicgr := TGPGraphics.Create(Canvas.Handle);
  LGPGraphicgr.FillRectangle(LGPBrush, MakeRect(20, 20, 300, 100));

  //Createしたオブジェクトは解放処理する
  LGPGraphicgr.Free;
  LGPBrush.Free;
end;
これも TGPLinearGradientBrush の関数の 1 つである
SetBlendBellShape を使用した例です.
「BellShape」という名前が付いた関数ですが「鐘の形」の意味はよくわかりません.この他にも多くの関数が用意されています.GDI+ のソースコード等で確認してください. |
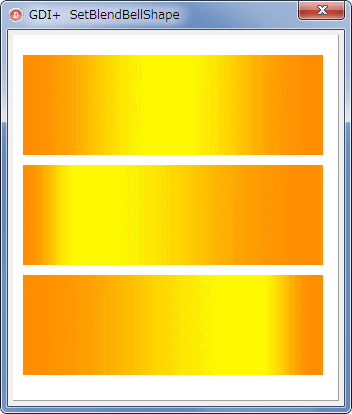 |
図20
SetBlendBellShape |
リスト10
SetBlendBellShape 関数の使用例 |
//-----------------------------------------------------------------------------
//  TMyPanelクラスのPaintメソッド
//  実際の描画コード
//-----------------------------------------------------------------------------
procedure TMyPanel.Paint;
var
  LGPGraphic : TGPGraphics;
  LGPBrush   : TGPLinearGradientBrush;
begin
  inherited;

  //TGPLinearGradientBrushのオブジェクトを生成
  //範囲は後で描画する四角形と同じとする
  LGPBrush := TGPLinearGradientBrush.Create(MakePoint( 10, 0),
                                           MakePoint(300, 0),
                                           aclDarkOrange,
                                           aclYellow);

  //TGPGraphicsのオブジェクトを生成
  LGPGraphic := TGPGraphics.Create(Canvas.Handle);

  //1番上の長方形
  //0.5は開始位置の指定で,0~1.0の値
  LGPBrush.SetBlendBellShape(0.5);
  LGPGraphic.FillRectangle(LGPBrush, MakeRect(10,  20, 300, 100));

  //2番目の長方形
  LGPBrush.SetBlendBellShape(0.2);
  LGPGraphic.FillRectangle(LGPBrush, MakeRect(10, 130, 300, 100));

  //2番目の長方形
  LGPBrush.SetBlendBellShape(0.8);
  LGPGraphic.FillRectangle(LGPBrush, MakeRect(10, 240, 300, 100));

  //Createしたオブジェクトは解放処理する
  LGPGraphic.Free;
  LGPBrush.Free;
end;
| テクスチャブラシは,画像等を格子状に描画します.配置の種類は 5 つあります.これらの動作を確認するためのサンプルプログラムです.テクスチャにはこの画像を使用しました.
|
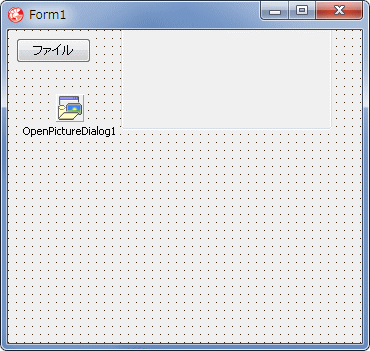 |
図21
設計時画面 |
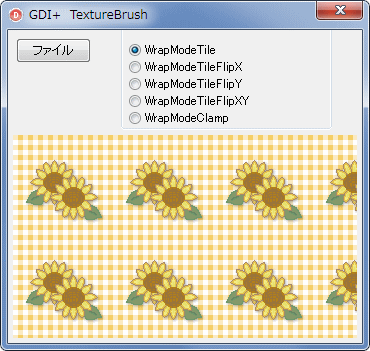 |
図22
実行画面 |
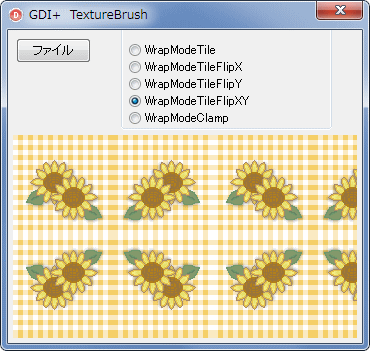 |
図23
配置方式を変更 |
unit Unit1;

interface

uses
  Windows, Messages, SysUtils, Classes, Graphics, Controls, Forms, Dialogs,
  ExtCtrls, StdCtrls, GDIPAPI, GDIPOBJ, ExtDlgs;

type
  TMyPanel = class(TPanel)
  protected
    procedure Paint; override;
  end;

  TForm1 = class(TForm)
    RadioGroup1: TRadioGroup;
    Button1: TButton;
    OpenPictureDialog1: TOpenPictureDialog;
    procedure FormCreate(Sender: TObject);
    procedure RadioGroup1Click(Sender: TObject);
    procedure Button1Click(Sender: TObject);
  private
    { Private 宣言 }
    MyPanel       : TMyPanel;
    FImageFilePath : string;
  public
    { Public 宣言 }
  end;

var
  Form1: TForm1;

implementation

uses
  TypInfo;

{$R *.DFM}

//=============================================================================
//  フォーム生成時の処理
//  GetEnumName,TypeInfoの使用には,usesにTypInfoが必要
//=============================================================================
procedure TForm1.FormCreate(Sender: TObject);
var
  i : Integer;
begin
  Caption := 'GDI+  TextureBrush';

  //TMyPanelを生成して配置
  MyPanel := TMyPanel.Create(Self);
  with MyPanel do begin
    Parent  := Self;
    Left    := 5;
    Top     := 105;
    Width   := Self.ClientWidth  - 10;
    Height  := Self.ClientHeight - Top - 5;
    Anchors := [akLeft, akTop, akRight, akBottom];
    Color   := clWhite;
    ParentBackground := False;
    DoubleBuffered   := True;
  end;

  FImageFilePath := ExtractFilePath(Application.ExeName) + '046641.gif';
  //TWrapModeの値を取得してRadioGroup1に定義名の文字列をセット
  for i := 0 to 4 do begin
    RadioGroup1.Items.Add(GetEnumName(TypeInfo(TWrapMode), i));
  end;
  RadioGroup1.ItemIndex := 0;
end;

//=============================================================================
//  [ファイル]ボタン
//  背景の画像を変更する場合
//=============================================================================
procedure TForm1.Button1Click(Sender: TObject);
begin
  if OpenPictureDialog1.InitialDir = '' then begin
    OpenPictureDialog1.InitialDir := ExtractFileDir(Application.ExeName);
  end;
  OpenPictureDialog1.Filter := '画像ファイル(*.png;*.jpg;*.jpeg;*.bmp|' +
                               '*.png;*.jpg;*.jpeg;*.bmp';

  if OpenPictureDialog1.Execute then begin
    FImageFilePath := OpenPictureDialog1.FileName;
    OpenPictureDialog1.InitialDir := ExtractFileDir(FImageFilePath);
    MyPanel.Invalidate;
  end;
end;

//=============================================================================
//  RadioGroup1のOnClickイベント処理
//  変更したらMyPanelを再描画
//=============================================================================
procedure TForm1.RadioGroup1Click(Sender: TObject);
begin
  MyPanel.Invalidate;
end;

{ TMyPanel }

//-----------------------------------------------------------------------------
//  TMyPanelクラスのPaintメソッド
//  実際の描画コード
//-----------------------------------------------------------------------------
procedure TMyPanel.Paint;
var
  LGPGraphicg : TGPGraphics;
  LGPRect     : TGPRect;
  LGPImg      : TGPImage;
  LGPTBrush   : TGPTextureBrush;
begin
  inherited;

  //TGPGrahicsのオブジェクトを生成
  LGPGraphicg := TGPGraphics.Create(Canvas.Handle);
  //描画領域を指定
  LGPRect := MakeRect(ClientRect);

  //背景に表示する画像用に,TGPImageオブジェクトを生成
  LGPImg    := TGPImage.Create(Form1.FImageFilePath);
  //画像をTGPTextuerBrushに指定する
  LGPTBrush := TGPTextureBrush.Create(LGPImg);

  //画像の配置状態を指定
  LGPTBrush.SetWrapMode(TWrapMode(Form1.RadioGroup1.ItemIndex));
  //四角形を描画,内部を指定したブラシで塗潰す
  LGPGraphicg.FillRectangle(LGPTBrush, LGPRect);

  //Createしたオブジェクトは解放処理する
  LGPImg.Free;
  LGPTBrush.Free;
  LGPGraphicg.Free;
end;

end.
GPPathGradientBrush (Delphi で使用する型は TGPPathGradientBrush) はパス専用のグラデーションブラシです.もちろん,これまでに説明したブラシも使用できます.
このオブジェクトの関数もまた多く用意されていて,その各々の関数の使用方法もバリエーションが豊富です.ここでは SetSurroundColors という関数だけを紹介しておきます.
この関数は,サラウンド色を設定します.サラウンド色とは,ブラシの境界,つまりパス上のいくつかの点に指定する色のことです.このサンプルでは 4 つの色を指定しています.パスグラデーションのサンプルもネット上に多くあるようです. |
 |
図24
設計時画面 |
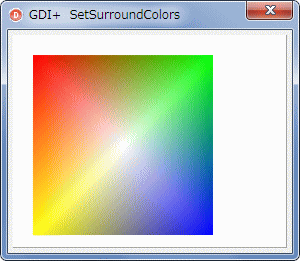 |
図25
実行画面 |
リスト12
PathGradientBrush
の SetSurroundColors 関数の使用例 |
unit Unit1;

interface

uses
  Windows, Messages, SysUtils, Classes, Graphics, Controls, Forms, Dialogs,
  ExtCtrls, StdCtrls, GDIPAPI, GDIPOBJ;

type
  TMyPanel = class(TPanel)
  protected
    procedure Paint; override;
  end;

  TForm1 = class(TForm)
    procedure FormCreate(Sender: TObject);
  private
    { Private 宣言 }
    MyPanel    : TMyPanel;
  public
    { Public 宣言 }
  end;

var
  Form1: TForm1;

implementation

{$R *.DFM}

//=============================================================================
//  フォーム生成時の処理
//=============================================================================
procedure TForm1.FormCreate(Sender: TObject);
begin
  Caption := 'GDI+  SetSurroundColors';

  //TMyPanelを生成して配置
  MyPanel := TMyPanel.Create(Self);
  with MyPanel do begin
    Parent  := Self;
    Left    := 5;
    Top     := 5;
    Width   := Self.ClientWidth  - 10;
    Height  := Self.ClientHeight - Top - 5;
    Anchors := [akLeft, akTop, akRight, akBottom];
    Color   := clWhite;
    ParentBackground := False;
    DoubleBuffered   := True;
  end;
end;

{ TMyPanel }

//-----------------------------------------------------------------------------
//  TMyPanelクラスのPaintメソッド
//  実際の描画コード
//  バス専用のグラデーション用関数の使用例
//-----------------------------------------------------------------------------
procedure TMyPanel.Paint;
const
  Colors: array[0..3] of TGPColor = ($FFFF0000, $FF00FF00, $FF0000FF, $FFFFFF00);
var
  LRect      : TRect;
  LGPGraphic : TGPGraphics;
  LGPPath    : TGPGraphicsPath;
  LGPBrush   : TGPPathGradientBrush;
  LCount     : Integer;
begin
  inherited;

  //描画領域を設定
  LRect := Bounds(20, 20, 180, 180);
  //TGPGrahicsのオブジェクトを生成
  LGPGraphic := TGPGraphics.Create(Canvas.Handle);

  //TGPGraphicsPathのオブジェクトを生成
  LGPPath := TGPGraphicsPath.Create;
  //そのパスに矩形を追加
  LGPPath.AddRectangle(MakeRect(LRect));

  //TGPPathGradientBrushオブジェクトを生成
  LGPBrush := TGPPathGradientBrush.Create(LGPPath);

  //設定した色の配列情報をブラシのオブジェクトに追加して,パス内部を塗潰す
  LCount := Length(Colors);
  LGPBrush.SetSurroundColors(PARGB(@Colors), LCount);
  LGPGraphic.FillPath(LGPBrush, LGPPath);

  //Createしたオブジェクトは解放処理する
  LGPBrush.Free;
  LGPPath.Free;
  LGPGraphic.Free;
end;

end.
グラデーション効果は,色,つまりピクセルに対して行われます.色の要素には透明度のアルファ値の要素があります.これを利用したサンプルです.
上と同じくパスグラデーションですが,開始位置を画像の中心とした放射状のグラデーションにして,その位置のアルファ値を 0 にしています.画像とグラデーションの重ね描画のようになっています.
下図が処理前の元の画像です. |
 |
図26
テストに使用した画像 |
| サンプルプログラムを実行してみると,見た目では,周辺をぼかしたような感じとなり,ちょっとメルヘンチックな画像となります. |
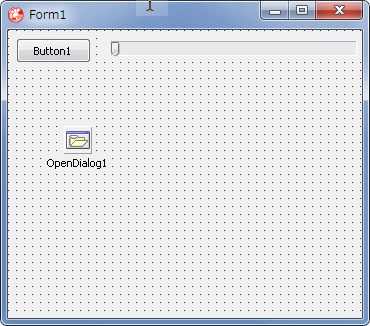
|
図27
設計時画面 |
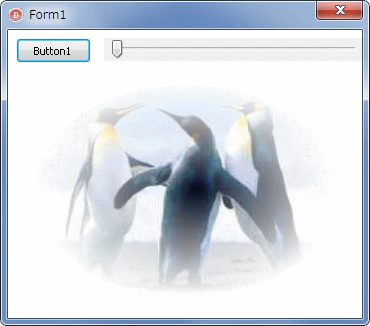 |
図28
添付の画像を表示
- グラデーションの始点 (アルファ値が 0) の位置は,画像の中央
- ここでは領域が楕円であるが,パスなのでいろいろな形にできる
|
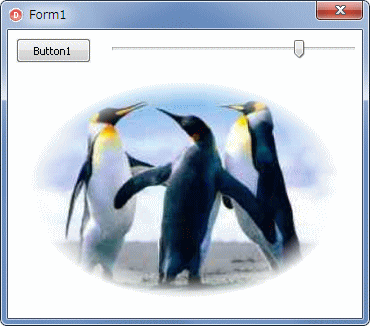 |
図29
グラデーションの始点変更 |
unit Unit1;

interface

uses
  Windows, Messages, SysUtils, Variants, Classes, Graphics, Controls, Forms,
  Dialogs, StdCtrls, ExtCtrls, ComCtrls, GDIPOBJ, GDIPAPI;

type
  TForm1 = class(TForm)
    Button1: TButton;
    TrackBar1: TTrackBar;
    OpenDialog1: TOpenDialog;
    procedure Button1Click(Sender: TObject);
    procedure FormPaint(Sender: TObject);
    procedure FormResize(Sender: TObject);
    procedure FormCreate(Sender: TObject);
    procedure TrackBar1Change(Sender: TObject);
  private
    { Private 宣言 }
    FImageFilePath : string;
  public
    { Public 宣言 }
  end;

var
  Form1: TForm1;

implementation

{$R *.dfm}

//=============================================================================
//  OnCreateイベント
//=============================================================================
procedure TForm1.FormCreate(Sender: TObject);
begin
  DoubleBuffered := True;

  with TrackBar1 do begin
    ShowSelRange := False;
    TickStyle    := tsNone;
    Min          := 0;
    Max          := 100;
    Position     := 0;
  end;
end;

//=============================================================================
//  [Button1]クリックイベント
//=============================================================================
procedure TForm1.Button1Click(Sender: TObject);
begin
  //画像ファイルを読み込む
  FImageFilePath := '';
  if OpenDialog1.InitialDir = '' then begin
    OpenDialog1.InitialDir := ExtractFilePath(Application.ExeName);
  end;

  OpenDialog1.Filter := '画像ファイル|*.png;*.jpg;*.jpeg;*.bmp;';
  if OpenDialog1.Execute then begin
    OpenDialog1.InitialDir := ExtractFileDir(OpenDialog1.FileName);
    FImageFilePath := OpenDialog1.FileName;
    Invalidate;
  end;
end;

//=============================================================================
//  TrackBar1のOnChangeイベント
//=============================================================================
procedure TForm1.TrackBar1Change(Sender: TObject);
begin
  Invalidate;
end;

//=============================================================================
//  OnPaintイベント
//  画像の放射状グラデーション表示
//=============================================================================
procedure TForm1.FormPaint(Sender: TObject);
var
  LGDPImage         : TGPImage;
  LGDPGraphic       : TGPGraphics;
  LGDPDrawRect      : TGPRect;
  LGDPPathGradBrush : TGPPathGradientBrush;
  LGDPPath          : TGPGraphicsPath;
  LSurroundCount    : Integer;
  LGDPColorSurround : TGPColor;
  LFocusScale       : Single;
begin
  if FImageFilePath = '' then exit;

  //描画の矩形領域の設定
  LGDPDrawRect := MakeRect(20, 50, ClientWidth - 40, ClientHeight - 70);

  //TGPGraphicsのインスタンスを生成して,背景を白で塗り潰す
  LGDPGraphic := TGPGraphics.Create(Canvas.Handle);
  LGDPGraphic.Clear(aclWhite);

  //楕円のパスを生成して,描画を楕円でクリップ
  LGDPPath := TGPGraphicsPath.Create;
  LGDPPath.AddEllipse(LGDPDrawRect);
  LGDPGraphic.SetClip(LGDPPath);

  //画像ファイルからTGPImageのインスタンスを生成して描画
  LGDPImage   := TGPImage.Create(FImageFilePath);
  LGDPGraphic.DrawImage(LGDPImage, LGDPDrawRect);


  //パスグラデーションのインスタンスを生成して,中心の色を指定
  //本サンプルでは,中心の色のアルファ値は0
  //周辺にいく程,透明度が低くなる(アルファ値にもグラデーションが適用されるので)
  //色の指定は MakeColor(A, R, G, B) でも可能
  LGDPPathGradBrush := TGPPathGradientBrush.Create(LGDPPath);
  LGDPPathGradBrush.SetCenterColor(aclWhite and $00FFFFFF);

  //周辺の色の設定
  LSurroundCount    := 1;
  LGDPColorSurround := aclWhite;
  LGDPPathGradBrush.SetSurroundColors(@LGDPColorSurround, LSurroundCount);

  //グラデーションの開始位置
  LFocusScale := TrackBar1.Position / 100;
  LGDPPathGradBrush.SetFocusScales(LFocusScale, LFocusScale);

  //楕円内を指定のブラシで塗り潰す
  LGDPGraphic.FillEllipse(LGDPPathGradBrush, LGDPDrawRect);

  LGDPPath.Free;
  LGDPImage.Free;
  LGDPGraphic.Free;
end;

//=============================================================================
//  OnResizeイベント
//=============================================================================
procedure TForm1.FormResize(Sender: TObject);
begin
  Invalidate;
end;

end.
矩形パスにすると下図のような感じになります.
矩形パスにするには,楕円パスの代わりに矩形パスを生成して,TGPGraphics.FillRectangle 関数を使用して矩形内部を塗り潰しします. |
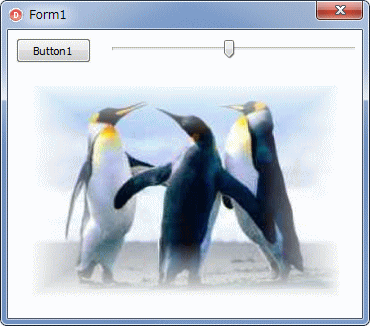 |
図30
矩形パスにした場合 |
リスト14
矩形パスの生成と,矩形パス内の塗り潰し |
  ...
  ...

  //矩形のパスを生成して,描画を楕円でクリップ
  LGDPPath := TGPGraphicsPath.Create;
  LGDPPath.AddRectangle(LGDPDrawRect);
  LGDPGraphic.SetClip(LGDPPath);

  ...
  ...

  //矩形内を指定のブラシで塗り潰す
  LGDPGraphic.FillRectangle(LGDPPathGradBrush, LGDPDrawRect);

  ...
  ...
パス文字列を作成し,いままで述べたブラシでパスの内部を塗潰すサンプルです.ただし,パス専用のパスグラデーションは使用していません.このように,いろいろブラシを変えてみると,同じ文字列でも印象が変わってきます.
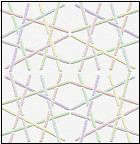
このサンプルでは,色の設定関係を TMyPanel のプロパティとして実装して,よりアプリケーション構成に近いコーディングとしています.テクスチャには下図を使用しています.
|
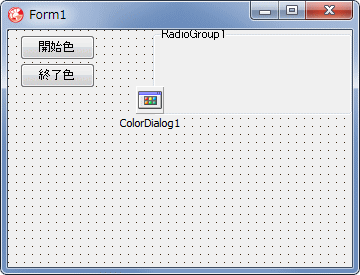 |
図31
設計時画面 |
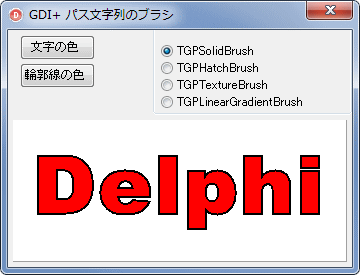 |
図32
ソリッドブラシ |
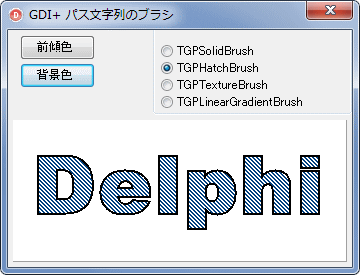 |
図33
ハッチブラシ |
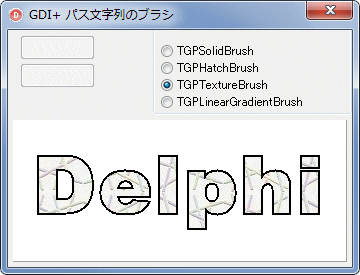 |
図34
テクスチャブラシ |
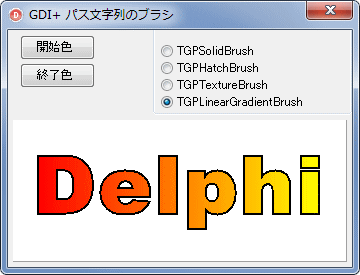 |
図35
グラデーションブラシ |
リスト15
パス文字列に,いろいろなブラシを適用してみる |
unit Unit1;

interface

uses
  Windows, Messages, SysUtils, Classes, Graphics, Controls, Forms, Dialogs,
  ExtCtrls, StdCtrls, GDIPAPI, GDIPOBJ;

type
  TMyPanel = class(TPanel)
  private
    FStartColor    : TGPColor;
    FEndColor      : TGPColor;
    FFrontColor    : TGPColor;
    FBackColor     : TGPColor;
    FBrushColor    : TGPColor;
    FLineColor     : TGPColor;
    FLineWidth     : integer;
    FImageFilePath : String;
    FText          : String;
  protected
    procedure Paint; override;
  public
    constructor Create(AOwner: TComponent); override;
    property StartColor    : TGPColor read FStartColor    write FStartColor;
    property EndColor      : TGPColor read FEndColor      write FEndColor;
    property FrontColor    : TGPColor read FFrontColor    write FFrontColor;
    property BackColor     : TGPColor read FBackColor     write FBackColor;
    property BrushColor    : TGPColor read FBrushColor    write FBrushColor;
    property LineColor     : TGPColor read FLineColor     write FLineColor;
    property LineWidth     : Integer  read FLineWidth     write FLineWidth;
    property ImageFilePath : String   read FImageFilePath write FImageFilePath;
    property Text          : String   read FText          write FText;
  end;

  TForm1 = class(TForm)
    RadioGroup1: TRadioGroup;
    Button1: TButton;
    Button2: TButton;
    ColorDialog1: TColorDialog;
    procedure FormCreate(Sender: TObject);
    procedure RadioGroup1Click(Sender: TObject);
    procedure Button1Click(Sender: TObject);
    procedure Button2Click(Sender: TObject);
  private
    { Private 宣言 }
    MyPanel : TMyPanel;
  public
    { Public 宣言 }
  end;

var
  Form1: TForm1;

implementation

{$R *.DFM}

//=============================================================================
//  フォーム生成時の処理
//=============================================================================
procedure TForm1.FormCreate(Sender: TObject);
begin
  Caption := 'GDI+ パス文字列のブラシ';

  //TMyPanelを生成して配置
  MyPanel := TMyPanel.Create(Self);
  with MyPanel do begin
    Parent  := Self;
    Left    := 5;
    Top     := 90;
    Width   := Self.ClientWidth  - 10;
    Height  := Self.ClientHeight - Top - 5;
    Anchors := [akLeft, akTop, akRight, akBottom];
    Color   := clWhite;
    ParentBackground := False;
    DoubleBuffered   := True;
  end;

  //生成したMyPanelの各種プロパティの設定
  MyPanel.ImageFilePath := '033609.jpg';
  MyPanel.Text          := 'Delphi';

  RadioGroup1.Caption := '';
  RadioGroup1.Items.Add('TGPSolidBrush');
  RadioGroup1.Items.Add('TGPHatchBrush');
  RadioGroup1.Items.Add('TGPTextureBrush');
  RadioGroup1.Items.Add('TGPLinearGradientBrush');

  RadioGroup1.ItemIndex := 0;
end;

//=============================================================================
//  [開始色]ボタン
//  RadioGroup1の選択項目によってタイトルと色を変えるようにしている
//=============================================================================
procedure TForm1.Button1Click(Sender: TObject);
begin
  if ColorDialog1.Execute then begin
    case RadioGroup1.ItemIndex of
      0: MyPanel.BrushColor := ColorRefToARGB(ColorDialog1.Color);
      1: MyPanel.FrontColor := ColorRefToARGB(ColorDialog1.Color);
      3: MyPanel.StartColor := ColorRefToARGB(ColorDialog1.Color);
    end;
  end;
  MyPanel.Invalidate;
end;

//=============================================================================
//  [終了色]ボタン
//  RadioGroup1の選択項目によってタイトルと色を変えるようにしている
//=============================================================================
procedure TForm1.Button2Click(Sender: TObject);
begin
  if ColorDialog1.Execute then begin
    case RadioGroup1.ItemIndex of
      0: MyPanel.LineColor := ColorRefToARGB(ColorDialog1.Color);
      1: MyPanel.BackColor := ColorRefToARGB(ColorDialog1.Color);
      3: MyPanel.EndColor  := ColorRefToARGB(ColorDialog1.Color);
    end;
  end;
  MyPanel.Invalidate;
end;

//=============================================================================
//  RadioGroup1のOnClickイベン
//  RadioGroup1の選択項目によってボタンのテキストと色を変更する
//=============================================================================
procedure TForm1.RadioGroup1Click(Sender: TObject);
begin
  Button1.Enabled := True;
  Button2.Enabled := True;

  case RadioGroup1.ItemIndex of
    0:
    begin
      Button1.Caption := '文字の色 ';
      Button2.Caption := '輪郭線の色 ';
    end;
    1:
    begin
      Button1.Caption := '前傾色 ';
      Button2.Caption := '背景色 ';
    end;
    2:
    begin
      Button1.Caption := ' ';
      Button2.Caption := '';
      Button1.Enabled := False;
      Button2.Enabled := False;
    end;
    3:
    begin
      Button1.Caption := '開始色 ';
      Button2.Caption := '終了色 ';
    end;
  end;
  MyPanel.Invalidate;
end;

{ TMyPanel }

//-----------------------------------------------------------------------------
//  TMyPanelのコンストラクタ
//  そのクラスのプロパティは,そのクラス内で初期化するのが,実用的
//-----------------------------------------------------------------------------
constructor TMyPanel.Create(AOwner: TComponent);
begin
  inherited;

  FStartColor := aclRed;
  FEndColor   := aclYellow;
  FFrontColor := aclSilver;
  FBackColor  := aclRed;
  FBrushColor := aclRed;
  FLineColor  := aclBlack;
  FLineWidth  := 2;
end;

//-----------------------------------------------------------------------------
//  TMyPanelクラスのPaintメソッド
//  実際の描画コード
//-----------------------------------------------------------------------------
procedure TMyPanel.Paint;
var
  LGPGraphicg   : TGPGraphics;
  LGPPath       : TGPGraphicsPath;
  LGPImag       : TGPImage;
  LGPBrush      : TGPBrush;
  LGPFontFamily : TGPFontFamily;
  LGPStrFormat  : TGPStringFormat;
  LGPPen        : TGPPen;
  LGPRect       : TGPRectF;
begin
  inherited;

  //TGPGraphicsPathのオブジェクトを生成
  LGPGraphicg := TGPGraphics.Create(Canvas.Handle);
  //TGPTextureBrushで使用する画像の指定
  LGPImag := TGPImage.Create(FImageFilePath);


  //バスのオブジェクトを生成
  LGPPath := TGPGraphicsPath.Create();

  //TGPFontFamilyとTGPStringFormatのオブジェクトを生成するが,特に設定はしない
  //デフォルトのまま使用
  LGPFontFamily := TGPFontFamily.Create('Arial Black');
  LGPStrFormat  := TGPStringFormat.Create;

  //バスに文字列を追加
  LGPPath.AddString(FText,              //描画する文字列
                   Length(FText),      //その長さ
                   LGPFontFamily,       //フォントの種類
                   FontStyleBold,      //フォントのスタイル
                   80,                 //フォントのサイズ
                   MakePoint(5.0,5.0), //描画開始位置(描画領域を指定いる関数もある)
                   LGPStrFormat);       //主に描画のアライメントの設定

  //バスの輪郭線を描くペンのオブジェクトを生成
  LGPPen := TGPPen.Create(FLineColor, FLineWidth);
  //文字列の描画領域を取得
  //実際にはパスの左右上下両端値の座標値.この領域をブラシの適用範囲とする
  LGPPath.GetBounds(LGPRect);

  //RadioGroup1のItemの値に応じて,該当するBrushオブジェクトを生成
  LGPBrush := nil;
  case Form1.RadioGroup1.ItemIndex of
    0: LGPBrush := TGPSolidBrush.Create(FBrushColor);
    1: LGPBrush := TGPHatchBrush.Create(HatchStyleDarkDownwardDiagonal,
                                       FFrontColor,
                                       FBackColor);
    2: LGPBrush := TGPTextureBrush.Create(LGPImag);
    3: LGPBrush := TGPLinearGradientBrush.Create(LGPRect, FStartColor, FEndColor, 0);
  end;

  //パスの内部を塗潰して輪郭線を描画
  LGPGraphicg.FillPath(LGPBrush, LGPPath);
  LGPGraphicg.DrawPath(LGPPen, LGPPath);

  //Createしたオブジェクトは解放処理する
  LGPBrush.Free;
  LGPPen.Free;
  LGPImag.Free;
  LGPStrFormat.Free;
  LGPFontFamily.Free;
  LGPPath.Free;
  LGPGraphicg.Free;
end;

end.
|


