Delphi Programming / Object Pascal Delphi サンプルプログラム集
679_他のアプリの操作とUI Automation 関係インターフェイス
動作確認等
Windows 7 U64(SP1) + Delphi XE(UP1) Pro + Firefox 13.0 以降Windows XP(SP3) 以上でないと使用不可
679_UIAutomation_Test.zip [3,433 KB] 2015年04月26日版 (EXE 同梱)
2012年06月07日
オブジェクトの階層のツリー表示と,サンプルの追加
ページのタイトルを変更
2012年06月09日
Delphi 2007 以前でも利用可能にするために,UIAutomationClient_TLB.pas の文字コードを UTF-8N から SHIFT-JIS に変更した
2012年06月19日
イベントハンドラのサンプルと記事を追加
2015年04月26日
Firefox のボタンをクリックするサンプルコードを修正
2015年04月28日
[645_ウィンドウの階層のツリー表示] のツール,ユティリティ関係の記事を本ページに移動
Accessibility ( MSAA ) と UI Automation
IUIAutomation 関係インターフェイスは,IAccessible インターフェイスの後継の API 群です.[IDL コンパイラを使用したタイプライブラリの作成と取り込み] の方法で,インターフェイスのユニットを作成してテストしてみました.
UIAutomationClient.idl から UIAutomationClient_TLB.pas を作成しました.これをパスの通った場所に置いて,uses に追加して使用します.タイプライブラリの取り込みで作成したままのコードではエラーが発生したため,筆者が修正,追加しています.変更内容は,コードの先頭に書いてあります.
IUIAutomation オブジェクト用に,TCUIAutomation というクラスがあります.このクラスを生成してインターフェイスのオブジェクトを作成します.関連するインターフェイスには,
(1) 各要素 (エレメント IUIAutomationElement) の GetCurrentPattern メソッドを実行
(2) 出力の IInteerface オブジェクトの QueryInterface メソッドで,目的とするオブジェクトのインスタンスを取得
という手順でアクセスできます.
Delphi 2007 以降には IAccessible インターフェイスに相当する OleAcc.pas が実装されていますが,これと
UIAutomationClient_TLB.pas と は同時には使用できません.
UIAutomationClient_TLB.pas には,IAccessible インターフェイスのオブジェクトのプロパティ等の取得や操作用のメソッド類が実装されています.これらを使用することになります.
[備考 1]
[備考 2]
[備考 3]
[備考 4]
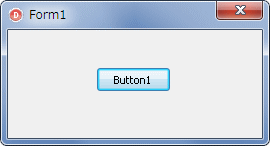
01_ 起動中のエクセルのウィンドウの位置とサイズを変更
起動中のエクセルを検出し,そのウィンドウハンドルから,UI Automation インターフェイスの機能を使用して,エクセルのウィンドウの位置とサイズを変更します.
図1
リスト1
copy code
unit Unit1;interface uses Windows, Messages, SysUtils, Variants, Classes, Graphics, Controls, Forms,
Dialogs, StdCtrls, UIAutomationClient_TLB;
type TForm1 = class (TForm)
Button1: TButton;
procedure Button1Click(Sender: TObject);private { Private 宣言 } public { Public 宣言 } end ;var Form1: TForm1;
implementation {$R *.dfm} // =============================================================================// UI Automationの簡単な使用例// // 起動中のエクセルの位置とサイズを変更// =============================================================================procedure TForm1.Button1Click(Sender: TObject);var hTargetWnd : HWND;
UIAuto : TCUIAutomation;
iElement : IUIAutomationElement;
iInter : IInterface;
TransPattern : IUIAutomationTransformPattern;
begin // 起動中のエクセルを検出hTargetWnd := FindWindow('XLMAIN' , nil );
if hTargetWnd = 0 then exit;// UIAutomation生成UIAuto := TCUIAutomation.Create(Self);
try // ウィンドウハンドルからIUIAutomationElement取得UIAuto.ElementFromHandle(hTargetWnd, iElement);
// そのエレメントにフォーカス移動iElement.SetFocus;
// IUIAutomationTransformPatternを取得して,エレメントの位置とサイズを変更iElement.GetCurrentPattern(UIA_TransformPatternId, iInter);
if Assigned(iInter) then begin if iInter.QueryInterface(IID_IUIAutomationTransformPattern,TransPattern) = S_OK then begin
TransPattern.Move (100 , 100 );
TransPattern.Resize (500 , 600 );
end ;end ;finally FreeAndNil(UIAuto);
end ;end ;end .
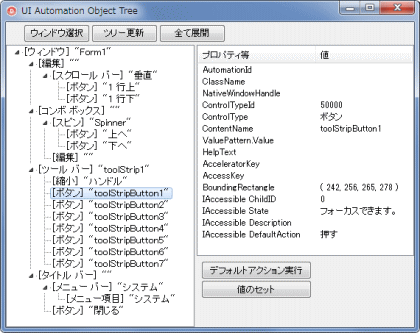
UI Automation オブジェクトの階層をツリー表示するサンプルです.テストしやすいように,ウィンドウを選択するダイアログを表示します.このダイアログは,[645_ ウィンドウの階層のツリー表示]
また,オブジェクトのツリーでも,選択中のオブジェクトを赤い枠線で表示します.この枠線の表示には,透明なフォームを使用しています.
ツリーの展開は,IAccessible インターフェイスの場合と比べて時間がかかります.特に階層が深いと待ち時間が長くなります.特定のウィンドウだけに限定した方が無難です.
図2
図3
リスト2
copy code
unit Unit1;interface uses Windows, Messages, SysUtils, Variants, Classes, Graphics, Controls, Forms,
Dialogs, StdCtrls, ExtCtrls, ComCtrls, ActiveX, Menus, plWindowRectFormUnit,
UIAutomationClient_TLB, Buttons;
type TForm1 = class (TForm)
TreeView1: TTreeView;
Panel1: TPanel;
Button2: TButton;
Splitter1: TSplitter;
Panel2: TPanel;
ListView1: TListView;
Button1: TButton;
PopupMenu1: TPopupMenu;
N1: TMenuItem;
Button3: TButton;
SpeedButton1: TSpeedButton;
SpeedButton2: TSpeedButton;
procedure TreeView1Deletion(Sender: TObject; Node: TTreeNode);procedure Button1Click(Sender: TObject);procedure Button2Click(Sender: TObject);procedure Button3Click(Sender: TObject);procedure N1Click(Sender: TObject);procedure FormCreate(Sender: TObject);procedure ListView1SelectItem(Sender: TObject; Item: TListItem;Selected: Boolean);
procedure FormCloseQuery(Sender: TObject; var CanClose: Boolean);procedure SpeedButton1Click(Sender: TObject);procedure TreeView1Change(Sender: TObject; Node: TTreeNode);procedure SpeedButton2Click(Sender: TObject);private { Private 宣言 } UIAuto : TCUIAutomation;
hTargetWnd : HWND;
RectForm : TplWindowRectForm;
public { Public 宣言 } end ;var Form1: TForm1;
implementation uses WindowTreeUnit, Clipbrd;{$R *.dfm} type // オブジェクトの情報用のレコード型// 各ノードのDataプロパティに代入しておくTplUIAutoInfoRec = record
Element : IUIAutomationElement;
AutoId : WideString;
end ;PplUIAutoInfoRec = ^TplUIAutoInfoRec;
// =============================================================================// フォーム生成時の処理// ListViewのColumns[1]のAutoSizeはTrueにしてある// =============================================================================procedure TForm1.FormCreate(Sender: TObject);begin UIAuto := TCUIAutomation.Create(Self);
ListView1.PopupMenu := nil ;
TreeView1.PopupMenu := nil ;
end ;// =============================================================================// フォームを閉じる時の処理// =============================================================================procedure TForm1.FormCloseQuery(Sender: TObject; var CanClose: Boolean);begin FreeAndNil(UIAuto);
if Assigned(RectForm) then begin RectForm.Close;
FreeAndNil(RectForm);
end ;end ;// =============================================================================// [ウィンドウ選択]ボタン// ウィンドウのリスト表示用のフォームをモーダル表示して選択// // hTargetWnd : 対象のウィンドウのハンドル// は,モーダル表示したフォームから取得する// TVariantArgの使用にはusesにActiveXが必要// =============================================================================procedure TForm1.Button1Click(Sender: TObject);// ---------------------------------------------------------------------------// 関数内関数// (1) TreeViewのノードに表示するテキストを作成し,ノードを追加// テキストは,ControlTypeプロパティとNameプロパティの値 // (2) ノードのDataプロパティにオブジェクトの情報を,レコード型で代入// 戻り値は,追加ノードのインスタンス// ---------------------------------------------------------------------------function AddChildNode(iElement: IUIAutomationElement; ATree: TTreeView;ANode: TTreeNode): TTreeNode;
var StrType : WideString;
StrName : WideString;
StrNode : WideString;
StrAutoId : WideString;
pUIAutoInfo : PplUIAutoInfoRec;
begin iElement.Get_CurrentLocalizedControlType(StrType);
iElement.Get_CurrentName(StrName);
StrNode := '[' + StrType + '] ' + ' "' + StrName + '"' ;
Result := ATree.Items.AddChild(ANode, StrNode);
// 要素の値をTreeViewのDataプロパティに代入(レコード型)if Result <> nil then begin iElement.Get_CurrentAutomationId(StrAutoId);
New(pUIAutoInfo);
pUIAutoInfo.Element := iElement;
pUIAutoInfo.AutoId := StrAutoId;
Result.Data := pUIAutoInfo;
end ;end ;// ---------------------------------------------------------------------------// 関数内関数// pParent階層下の子オブジェクトを再帰処理で列挙し,TreeViewのノードに追加// ---------------------------------------------------------------------------procedure EnumAccTreeItems(pParent: IUIAutomationElement; Scope: TreeScope;pCondition: IUIAutomationCondition; ATree: TTreeView; ANode: TTreeNode);
var found : IUIAutomationElementArray;
ALen : Integer;
i : Integer;
iElement : IUIAutomationElement;
AddNode : TTreeNode;
begin if pParent = nil then exit;pParent.FindAll(Scope, pCondition, found);
found.Get_Length(ALen);
// i=0は自分自身なので除外for i := 1 to ALen - 1 do begin found.GetElement(i, iElement);
AddNode := AddChildNode(iElement, ATree, ANode);
EnumAccTreeItems(iElement, Scope, pCondition, ATree, AddNode);
Application.ProcessMessages;
Sleep(1 );
end ;end ;// ---------------------------------------------------------------------------var AForm : TWindowTreeForm;
Ret : Integer;
RootElement : IUIAutomationElement;
RootNode : TTreeNode;
Scope : TreeScope;
varProp : OleVariant;
pCondition : IUIAutomationCondition;
begin if Assigned(RectForm) then begin RectForm.Close;
FreeAndNil(RectForm);
end ;ListView1.PopupMenu := nil ;
// ウィンドウの選択ダイアログを表示Ret := mrOk;
if Sender <> nil then begin AForm := TWindowTreeForm.Create(Self);
try Ret := AForm.ShowModal;
if Ret = mrOk then begin Self.Update;
hTargetWnd := AForm.hTargetWnd;
end ;finally FreeAndNil(AForm);
end ;end ;// ウィンドウの選択ダイアログのモーダル結果がmrOkだったら列挙開始if Ret = mrOk then begin Screen.Cursor := crHourGlass;
TreeView1.Items.Clear;
ListView1.Items.Clear;
// ウィンドウハンドルからIUIAutomationElementオブジェクトを取得if Succeeded(UIAuto.ElementFromHandle(hTargetWnd, RootElement)) then begin // 検索条件設定// pConditionに検索条件のポインタが格納されるTVariantArg(varProp).vt := VT_BOOL;
TVariantArg(varProp).vbool := True;
UIAuto.CreatePropertyCondition(UIA_IsControlElementPropertyId,
varProp,
pCondition);
Scope := TreeScope_Element or TreeScope_Children;
// TreeViewのルートノード生成RootNode := AddChildNode(RootElement, TreeView1, nil );
TreeView1.Items.BeginUpdate;
// 検索,列挙実行EnumAccTreeItems(RootElement, Scope, pCondition, TreeView1, RootNode);
TreeView1.Items.EndUpdate;
TreeView1.TopItem.Expand(False);
end ;Screen.Cursor := crDefault;
end ;end ;// =============================================================================// [ツリー更新]ボタン// オブジェクトの再取得// =============================================================================procedure TForm1.Button2Click(Sender: TObject);begin if TreeView1.Items.Count > 1 then begin Button1Click(nil );
end ;end ;// =============================================================================// [全て展開]ボタン// =============================================================================procedure TForm1.Button3Click(Sender: TObject);begin if Assigned(RectForm) then begin RectForm.Close;
FreeAndNil(RectForm);
end ;if TreeView1.Items.Count = 0 then exit;TreeView1.Items.BeginUpdate;
TreeView1.FullExpand;
TreeView1.TopItem := TreeView1.Items[0 ];
TreeView1.Items.EndUpdate;
end ;// =============================================================================// [デフォルトアクション実行]ボタン// オブジェクトのデフォルト動作を実行// 全てのオブジェクトに対して有効なわけではない// // IUIAutomationInvokePatternインターフェイスのInvokeでは機能しないコントロー// ルがあったので,IUIAutomationLegacyIAccessiblePatternインターフェイスで// レガシー(?)なIAccessibleのDoDefaultActionを実行// これでも動作しないコントロールがある(Windowsのバージョンとアプリによる)// =============================================================================procedure TForm1.SpeedButton1Click(Sender: TObject);var pUIAutoInfo : PplUIAutoInfoRec;
iElement : IUIAutomationElement;
iInter : IInterface;
AccPattern : IUIAutomationLegacyIAccessiblePattern;
begin if TreeView1.Selected = nil then exit;// NodeのDataプロパティからオブジェクトのデータを取出す// このデータはレコード型で格納されているpUIAutoInfo := TreeView1.Selected.Data;
iElement := pUIAutoInfo.Element;
if Assigned(iElement) then begin iElement.GetCurrentPattern(UIA_LegacyIAccessiblePatternId, iInter);
if Assigned(iInter) then begin if iInter.QueryInterface(IID_IUIAutomationLegacyIAccessiblePattern,AccPattern) = S_OK then begin
// IUIAutomationLegacyIAccessiblePatternのDoDefaultAction実行AccPattern.DoDefaultAction;
end ;end ;end ;end ;// =============================================================================// [値のセット]ボタン// オブジェクトに対してIUIAutomationValuePatternインターフェイスのSetValue// メソッドでを実行// オブジェクトに値をセットする.編集可能なオブジェクトが対象// 全てのオブジェクトに対して有効なわけではない// // InputQueryで1行だけとしているが,実際にはTMemo等への複数行のセットも可能// =============================================================================procedure TForm1.SpeedButton2Click(Sender: TObject);var pUIAutoInfo : PplUIAutoInfoRec;
iElement : IUIAutomationElement;
iInter : IInterface;
ValPattern : IUIAutomationValuePattern;
StrText : WideString;
StrInput : String ;
begin if TreeView1.Selected = nil then exit;// NodeのDataプロパティからオブジェクトのデータを取出す// このデータはレコード型で格納されているpUIAutoInfo := TreeView1.Selected.Data;
iElement := pUIAutoInfo.Element;
iElement.GetCurrentPattern(UIA_ValuePatternId, iInter);
if Assigned(iInter) then begin if iInter.QueryInterface(IID_IUIAutomationValuePattern,ValPattern) = S_OK then begin
ValPattern.Get_CurrentValue(StrText);
StrInput := StrText;
if InputQuery('値のセット' , '' , StrInput) then begin ValPattern.SetValue(StrInput);
end ;end ;end ;end ;// =============================================================================// TreeView1のOnChangeイベント処理// TreeView1の選択ノードが変更になったら,プロパティ等を取得してListViewに表示// TVariantArgの使用にはusesにActiveXが必要// =============================================================================procedure TForm1.TreeView1Change(Sender: TObject; Node: TTreeNode);// ---------------------------------------------------------------------------// ListViewにItemを追加するメソッド// ---------------------------------------------------------------------------procedure ListViewItemAdd(LV: TListView; ACaption, SubItem: String );var LVItem : TListItem;
begin LVItem := LV.Items.Add;
LVItem.Caption := ACaption;
LVItem.SubItems.Text := SubItem;
end ;// ---------------------------------------------------------------------------var ShowFlag : Cardinal;
pUIAutoInfo : PplUIAutoInfoRec;
iElement : IUIAutomationElement;
AutoId : WideString;
StrText : WideString;
pIntValue : Pointer;
ItemRect : TRect;
iInter : IInterface;
ValPattern : IUIAutomationValuePattern;
varChild : OleVariant;
varState : OleVariant;
TmpInt : Integer;
Len : Cardinal;
i : Integer;
StateID : Integer;
TmpStr : String ;
LineWidth : Integer;
LineColor : TColor;
begin // オブジェクトの周りに表示する矩形用のフォームを生成if not Assigned(RectForm) then begin RectForm := TplWindowRectForm.Create(Self);
RectForm.Show;
TreeView1.SetFocus;
end else begin RectForm.Canvas.FillRect(RectForm.ClientRect);
end ;ShowFlag := SWP_NOACTIVATE or SWP_NOMOVE or SWP_NOSIZE or SWP_NOOWNERZORDER;
SetWindowPos(RectForm.Handle, HWND_TOPMOST, 0 , 0 , 0 , 0 , ShowFlag);
// NodeのDataプロパティからオブジェクトのデータを取出す// このデータはレコード型で格納されているpUIAutoInfo := Node.Data;
iElement := pUIAutoInfo.Element;
AutoId := pUIAutoInfo.AutoId;
ListView1.Items.Clear;
ListView1.Items.BeginUpdate;
// AutomationIdの値を追加// アプリ内で必ずしも一意の値ではないが,固有の値ListViewItemAdd(ListView1, 'AutomationId' , AutoID);
// ウィンドウのクラス名を取得して追加iElement.Get_CurrentClassName(StrText);
ListViewItemAdd(ListView1, 'ClassName' , StrText);
// ウィンドウハンドルを取得して追加StrText := '' ;
iElement.Get_CurrentNativeWindowHandle(pIntValue);
if HWND(pIntValue) <> 0 then begin StrText := Format('$%.8x (%d)' , [HWND(pIntValue), HWND(pIntValue)]);
end ;ListViewItemAdd(ListView1, 'NativeWindowHandle' , StrText);
// ControlTypeの値を取得して追加(数値)iElement.Get_CurrentControlType(TmpInt);
ListViewItemAdd(ListView1, 'ControlTypeId' , IntToStr(TmpInt));
// ControlTypeの値を取得して追加(テキスト)iElement.Get_CurrentLocalizedControlType(StrText);
ListViewItemAdd(ListView1, 'ControlType' , StrText);
// ContentNameの値を取得して追加iElement.Get_CurrentName(StrText);
ListViewItemAdd(ListView1, 'ContentName' , StrText);
// Valueの値(テキスト等)を取得して追加StrText := '' ;
iElement.GetCurrentPattern(UIA_ValuePatternId, iInter);
if Assigned(iInter) then begin if iInter.QueryInterface(IID_IUIAutomationValuePattern,ValPattern) = S_OK then begin
ValPattern.Get_CurrentValue(StrText);
end ;end ;ListViewItemAdd(ListView1, 'ValuePattern.Value' , StrText);
// HelpTextの値を取得して追加iElement.Get_CurrentHelpText(StrText);
ListViewItemAdd(ListView1, 'HelpText' , StrText);
// AcceleratorKeyの値を取得して追加iElement.Get_CurrentAcceleratorKey(StrText);
ListViewItemAdd(ListView1, 'AcceleratorKey' , StrText);
// AccessKeyの値を取得して追加iElement.Get_CurrentAccessKey(StrText);
ListViewItemAdd(ListView1, 'AccessKey' , StrText);
// BoundingRectangleの値を取得して追加iElement.Get_CurrentBoundingRectangle(tagRect(ItemRect));
StrText := '( ' + IntToStr(ItemRect.Left) + ', ' +
IntTostr(ItemRect.Top) + ', ' +
IntTostr(ItemRect.Right) + ', ' +
IntToStr(ItemRect.Bottom) + ' )' ;
ListViewItemAdd(ListView1, 'BoundingRectangle' , StrText);
// IAccessibleオブジェクトの子オブジェクトのIDを取得して追加StrText := '' ;
iElement.GetCurrentPropertyValue(UIA_LegacyIAccessibleChildIdPropertyId,
varChild);
if TVariantArg(varChild).vt = VT_I4 then begin StrText := IntToStr(TVariantArg(varChild).lVal);
end ;ListViewItemAdd(ListView1, 'IAccessible ChildID' , StrText);
// IAccessibleオブジェクトのStateプロパティの値を取得し,文字列に変換して追加// Stateは複数の場合がある// Stateプロパティの値が2の倍数で増加していくことを利用してループ処理StrText := '' ;
iElement.GetCurrentPropertyValue(UIA_LegacyIAccessibleStatePropertyId, varState);
if TVariantArg(varState).vt = VT_I4 then begin TmpInt := TVariantArg(varState).lVal;
StateID := 1 ;
for i := 1 to 29 do begin if (TmpInt and StateID) <> 0 then begin Len := GetStateTextW(StateID, nil , 0 );
SetLength(TmpStr, Len);
GetStateTextW(StateID, PWideChar(TmpStr), Len);
StrText := StrText + Trim(TmpStr) + '。' ;
end ;StateID := StateID * 2 ;
end ;end ;ListViewItemAdd(ListView1, 'IAccessible State' , StrText);
// IAccessibleオブジェクトのDescriptionプロパティの値を取得して追加StrText := '' ;
iElement.GetCurrentPropertyValue(UIA_LegacyIAccessibleDescriptionPropertyId,
varState);
if TVariantArg(varState).vt = VT_BSTR then begin StrText := TVariantArg(varState).bstrVal;
end ;ListViewItemAdd(ListView1, 'IAccessible Description' , StrText);
// IAccessibleオブジェクトのDefaultActionプロパティの値を取得して追加StrText := '' ;
iElement.GetCurrentPropertyValue(UIA_LegacyIAccessibleDefaultActionPropertyId,
varState);
if TVariantArg(varState).vt = VT_BSTR then begin StrText := TVariantArg(varState).bstrVal;
end ;ListViewItemAdd(ListView1, 'IAccessible DefaultAction' , StrText);
ListView1.Items.EndUpdate;
// オブジェクトを囲む枠線を描画LineWidth := 4 ;
LineColor := clRed;
with RectForm.Canvas do begin Pen.Color := LineColor;
Pen.Width := LineWidth;
MoveTo (ItemRect.Left, ItemRect.Top);
LineTo (ItemRect.Right, ItemRect.Top);
LineTo (ItemRect.Right, ItemRect.Bottom);
LineTo (ItemRect.Left, ItemRect.Bottom);
LineTo (ItemRect.Left, ItemRect.Top);
end ;Sleep(1 );
end ;// =============================================================================// TreeView1のOnDeletionイベント処理// TreeViewのDataプロパティに代入したデータの解放処理// =============================================================================procedure TForm1.TreeView1Deletion(Sender: TObject; Node: TTreeNode);begin if Assigned(Node.Data) then begin Dispose(PplUIAutoInfoRec(Node.Data));
Node.Data := nil ;
end ;end ;// =============================================================================// ListView1のOnSelectItemイベント処理// Itemを選択したら,ポップアップメニューを使用可能にする// =============================================================================procedure TForm1.ListView1SelectItem(Sender: TObject; Item: TListItem;Selected: Boolean);
begin if Selected then begin ListView1.PopupMenu := PopupMenu1;
end else begin ListView1.PopupMenu := nil ;
end ;end ;// =============================================================================// ListView1のボップアップメニューの[コピー]// PopupMenu1のAutoHotkeysとAutoLineReductionプロパティはmaManual// =============================================================================procedure TForm1.N1Click(Sender: TObject);var AIndex : Integer;
StrText : String ;
begin AIndex := ListView1.ItemIndex;
StrText := ListView1.Items[AIndex].Caption + Char(VK_TAB) +
ListView1.Items[AIndex].SubItems[0 ];
Clipboard.AsText := StrText;
end ;end .
03_ ブラウザ Firefox の [ 戻る ] [ 進む ] ボタンをクリック
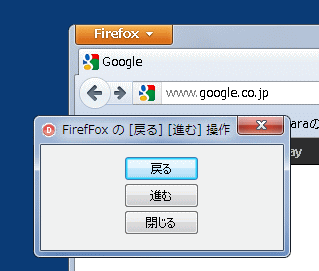
Firefox ブラウザの [戻る] と [進む] ボタンを,Delphi から操作するサンプルです.
[閉じる] ボタンのテストコードがありますが,Windows XP(SP3) + Firefox 12.0 では動作しましたが,Windows 7 U64(SP1) + Firefox 13.0 では動作しませんでした.
図4
リスト3
copy code
unit Unit1;interface uses Windows, Messages, SysUtils, Variants, Classes, Graphics, Controls, Forms,
Dialogs, ExtCtrls, StdCtrls, UIAutomationClient_TLB;
type TForm1 = class (TForm)
Button1: TButton;
Button2: TButton;
Button3: TButton;
procedure Button1Click(Sender: TObject);procedure Button2Click(Sender: TObject);procedure Button3Click(Sender: TObject);procedure FormCreate(Sender: TObject);private { Private declarations } UIAuto : TCUIAutomation;
procedure SearchElementInvokeByName(RootElement: IUIAutomationElement;StrText: WideString);
public { Public declarations } end ;var Form1: TForm1;
implementation uses ActiveX;{$R *.dfm} // 対象のウィンドウの情報を格納するレコード型の定義type TTargetWndInfo = record
hWindow : HWND;
ClassName : String ;
end ;PTargetWndInfo = ^TTargetWndInfo;
// -----------------------------------------------------------------------------// EnumWindowsのコールバック関数// 可視で他に所有されていないトップレベルのウィンドウだけを検出// PTargetWndInfoはウィンドウの情報を格納するレコード型のポインタ// -----------------------------------------------------------------------------function EnumVisbleNoOwnedWndProc(hWindow: HWND; lData: PTargetWndInfo): BOOL; stdcall ;// ---------------------------------------------------------------------------// 引数のウィンドウがオーナーウィンドウであるかを調査// ---------------------------------------------------------------------------function IsOwnedWindow(hWindow: HWND): Boolean;begin Result := Windows.GetWindow(hWindow, GW_OWNER) <> 0 ;
end ;// -----------------------------------------------------------------------------// ウィンドウハンドルからウィンドウクラス名を取得// -----------------------------------------------------------------------------function GetClassNameStr(hWindow: HWND): string ;var Buffer : array [0 ..MAX_PATH-1 ] of Char;
Len : Integer;
begin FillChar(Buffer, SizeOf(Buffer), #0 );
Len := GetClassName(hWindow, Buffer, Length(Buffer));
if Len > 0 then Result := Buffer else Result := '' ;end ;// -----------------------------------------------------------------------------var LClassName : String ;
begin Result := True;
if IsOwnedWindow(hWindow) then exit;if not Windows.IsWindowVisible(hWindow) then exit;// クラス名が同じだったら,そのウィンドウハンドルをコールバックの引数に返すLClassName := UpperCase(GetClassNameStr(hWindow));
if LClassName = UpperCase(lData^.ClassName) then begin lData^.hWindow := hWindow;
Result := False;
end ;end ;// =============================================================================// UIAutomationオブジェクトのインスタンスを生成// =============================================================================procedure TForm1.FormCreate(Sender: TObject);begin UIAuto := TCUIAutomation.Create(Self);
end ;// =============================================================================// [戻る]ボタンクリック// 要素の検索にFindAllメソッドを使用した例// TVariantArgの使用にはusesにActiveXが必要// =============================================================================procedure TForm1.Button1Click(Sender: TObject);var LWndInfo : TTargetWndInfo;
LTargetWnd : HWND;
LRootElement : IUIAutomationElement;
LvarProp : OleVariant;
LScope : TreeScope;
LpCondition : IUIAutomationCondition;
LfoundArray : IUIAutomationElementArray;
Lfound : IUIAutomationElement;
LStrSearch : WideString;
LiInter : IInterface;
LpInvoke : IUIAutomationInvokePattern;
begin // Firefoxのハンドルを取得LWndInfo.ClassName := 'MozillaWindowClass' ;
LWndInfo.hWindow := 0 ;
// 指定クラス名のウィンドウを検索EnumWindows(@EnumVisbleNoOwnedWndProc, LPARAM(@LWndInfo));
LTargetWnd := LWndInfo.hWindow;
if LTargetWnd = 0 then exit;// ウィンドウハンドルからIUIAutomationElementオブジェクトを取得if UIAuto.ElementFromHandle(LTargetWnd, LRootElement) = S_OK then begin // 検索条件設定// Nameプロパティの値で検索// pConditionに検索条件のポインタが格納されるLStrSearch := '戻る' ;
TVariantArg(LvarProp).vt := VT_BSTR;
TVariantArg(LvarProp).bstrVal := PWideChar(LStrSearch);
UIAuto.CreatePropertyCondition(UIA_NamePropertyId, LvarProp, LpCondition);
LScope := TreeScope_Element or TreeScope_Children or TreeScope_Subtree;
// 検索実行LRootElement.FindAll(LScope, LpCondition, LfoundArray);
// 見つかった最初の要素だけを取り出すLfoundArray.GetElement(0 , Lfound);
end ;// 要素のInvoke関係のIUIAutomationInvokePatternインターフェイスを取得if Assigned(Lfound) then begin Lfound.GetCurrentPattern(UIA_InvokePatternId, LiInter);
if Assigned(LiInter) then begin if LiInter.QueryInterface(IID_IUIAutomationInvokePattern,LpInvoke) = S_OK then begin
LpInvoke.Invoke;
end ;end ;end ;end ;// =============================================================================// [進む]ボタンクリック// 要素の検索にFindFirstメソッドを使用した例// // FindFirstの方がFindAllよりも検索が早いらしい// MSDNの記事によると,Windows Presentation Foundation(WPF)コントロールの場合// はFindAllメソッドの方が速いらしい// =============================================================================procedure TForm1.Button2Click(Sender: TObject);var LWndInfo : TTargetWndInfo;
LTargetWnd : HWND;
LRootElement : IUIAutomationElement;
LStrSearch : WideString;
begin // Firefoxのハンドルを取得LWndInfo.ClassName := 'MozillaWindowClass' ;
LWndInfo.hWindow := 0 ;
// 指定クラス名のウィンドウを検索EnumWindows(@EnumVisbleNoOwnedWndProc, LPARAM(@LWndInfo));
LTargetWnd := LWndInfo.hWindow;
if LTargetWnd = 0 then exit;// ウィンドウハンドルからIUIAutomationElementオブジェクトを取得if UIAuto.ElementFromHandle(LTargetWnd, LRootElement) = S_OK then begin LStrSearch := '進む' ;
SearchElementInvokeByName(LRootElement, LStrSearch);
end ;end ;// =============================================================================// [閉じる]ボタンクリック// 要素の検索にFindFirstメソッドを使用した例// // Windows 7 + Firefox 13.0では動作しない// // FindFirstの方がFindAllよりも検索が早いらしい// MSDNの記事によると,Windows Presentation Foundation(WPF)コントロールの場合// はFindAllメソッドの方が速いらしい// =============================================================================procedure TForm1.Button3Click(Sender: TObject);var LWndInfo : TTargetWndInfo;
LTargetWnd : HWND;
LRootElement : IUIAutomationElement;
LStrSearch : WideString;
begin // Firefoxのハンドルを取得LWndInfo.ClassName := 'MozillaWindowClass' ;
LWndInfo.hWindow := 0 ;
// 指定クラス名のウィンドウを検索EnumWindows(@EnumVisbleNoOwnedWndProc, LPARAM(@LWndInfo));
LTargetWnd := LWndInfo.hWindow;
if LTargetWnd = 0 then exit;// ウィンドウハンドルからIUIAutomationElementオブジェクトを取得if UIAuto.ElementFromHandle(LTargetWnd, LRootElement) = S_OK then begin LStrSearch := '閉じる' ;
SearchElementInvokeByName(LRootElement, LStrSearch);
end ;end ;// =============================================================================// NameプロパティのオブジェクトをRootElementの要素の階層下から検索// 検索に成功したら,デフォルトのアクションを実行// IUIAutomationInvokePatternインターフェイスのInvokeでは機能しないコントロー// ルがあったので,IUIAutomationLegacyIAccessiblePatternインターフェイスで// レガシー(?)なIAccessibleのDoDefaultActionを実行// これでも動作しないコントロールがある(OSとアプリによる)// // TVariantArgの使用には,usesにActiveXが必要// =============================================================================procedure TForm1.SearchElementInvokeByName(RootElement: IUIAutomationElement;StrText: WideString);
var LvarProp : OleVariant;
LScope : TreeScope;
LpCondition : IUIAutomationCondition;
Lfound : IUIAutomationElement;
LiInter : IInterface;
LAccPattern : IUIAutomationLegacyIAccessiblePattern;
begin // 検索条件設定// Nameプロパティの値で検索// pConditionに検索条件のポインタが格納されるTVariantArg(LvarProp).vt := VT_BSTR;
TVariantArg(LvarProp).bstrVal := PWideChar(StrText);
UIAuto.CreatePropertyCondition(UIA_NamePropertyId, LvarProp, LpCondition);
LScope := TreeScope_Element or TreeScope_Children or TreeScope_Subtree;
// 検索実行RootElement.FindFirst(LScope, LpCondition, Lfound);
// 要素のIUIAutomationLegacyIAccessiblePatternインターフェイスを取得if Assigned(Lfound) then begin Lfound.GetCurrentPattern(UIA_LegacyIAccessiblePatternId, LiInter);
if Assigned(LiInter) then begin if LiInter.QueryInterface(IID_IUIAutomationLegacyIAccessiblePattern,LAccPattern) = S_OK then begin
// IUIAutomationLegacyIAccessiblePatternのDoDefaultAction実行LAccPattern.DoDefaultAction;
end ;end ;end ;end ;end .
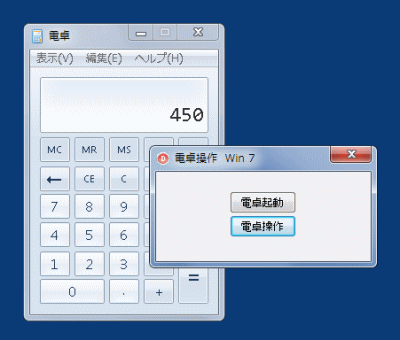
Windows 7 の [アクセサリ] の [電卓] を起動して,操作します.実際には,
という計算を,Delphi のコードからキーを押して計算します.
オブジェクトの情報取得,あるいは操作には,AutomationId の値を使用する方が確実です.
[備考]
図5
リスト4
copy code
unit Unit1;interface uses Windows, Messages, SysUtils, Variants, Classes, Graphics, Controls, Forms,
Dialogs, ExtCtrls, StdCtrls, UIAutomationClient_TLB;
type TForm1 = class (TForm)
Button1: TButton;
Button2: TButton;
procedure Button1Click(Sender: TObject);procedure Button2Click(Sender: TObject);procedure FormCreate(Sender: TObject);private { Private declarations } UIAuto : TCUIAutomation;
hTargetWnd : HWND;
procedure SearchElementInvokeByName(RootElement: IUIAutomationElement;StrText: WideString);
public { Public declarations } end ;var Form1: TForm1;
implementation uses ActiveX, ShellAPI;{$R *.dfm} // =============================================================================// UIAutomationオブジェクトのインスタンスを生成 ClassName CalcFrame// =============================================================================procedure TForm1.FormCreate(Sender: TObject);begin UIAuto := TCUIAutomation.Create(Self);
end ;// =============================================================================// [電卓起動]ボタンクリック// ShellExecuteの使用には,usesにShellAPIが必要// =============================================================================procedure TForm1.Button1Click(Sender: TObject);begin hTargetWnd := FindWindow(nil , '電卓' );
if hTargetWnd <> 0 then exit;ShellExecute(Handle, nil , 'calc.exe' , nil , nil , SW_SHOW);
end ;// =============================================================================// [電卓操作]ボタンクリック// ボタンの名前(Nameプロパティの値)も,数字以外は違っているので注意// =============================================================================procedure TForm1.Button2Click(Sender: TObject);var RootElement : IUIAutomationElement;
SleepTime : Cardinal;
begin hTargetWnd := FindWindow(nil , '電卓' );
if hTargetWnd = 0 then exit;// ウィンドウハンドルからIUIAutomationElementオブジェクトを取得if UIAuto.ElementFromHandle(hTargetWnd, RootElement) = S_OK then begin SleepTime := 800 ;
// Windows XPでは CESearchElementInvokeByName(RootElement, '入力のクリア' );
Sleep(SleepTime);
SearchElementInvokeByName(RootElement, '1' );
Sleep(SleepTime);
SearchElementInvokeByName(RootElement, '0' );
Sleep(SleepTime);
SearchElementInvokeByName(RootElement, '0' );
Sleep(SleepTime);
// Windows XPでは +SearchElementInvokeByName(RootElement, '加算' );
Sleep(SleepTime);
SearchElementInvokeByName(RootElement, '3' );
Sleep(SleepTime);
SearchElementInvokeByName(RootElement, '5' );
Sleep(SleepTime);
SearchElementInvokeByName(RootElement, '0' );
Sleep(SleepTime);
// Windows XPでは =SearchElementInvokeByName(RootElement, '等号' );
end ;end ;// =============================================================================// NameプロパティのオブジェクトをRootElementの要素の階層下から検索// 検索に成功したら,IUIAutomationInvokePatternインターフェイスのInvokeを実行// TVariantArgの使用には,usesにActiveXが必要// =============================================================================procedure TForm1.SearchElementInvokeByName(RootElement: IUIAutomationElement;StrText: WideString);
var varProp : OleVariant;
Scope : TreeScope;
pCondition : IUIAutomationCondition;
found : IUIAutomationElement;
iInter : IInterface;
pInvoke : IUIAutomationInvokePattern;
begin // 検索条件設定// Nameプロパティの値で検索// pConditionに検索条件のポインタが格納されるTVariantArg(varProp).vt := VT_BSTR;
TVariantArg(varProp).bstrVal := PWideChar(StrText);
UIAuto.CreatePropertyCondition(UIA_NamePropertyId, varProp, pCondition);
Scope := TreeScope_Element or TreeScope_Children or TreeScope_Subtree;
// 検索実行RootElement.FindFirst(Scope, pCondition, found);
// 要素のIUIAutomationInvokePatternインターフェイスを取得if Assigned(found) then begin found.GetCurrentPattern(UIA_InvokePatternId, iInter);
if Assigned(iInter) then begin if iInter.QueryInterface(IID_IUIAutomationInvokePattern,pInvoke) = S_OK then begin
// IUIAutomationInvokePatternインターフェイスのInvokeメソッドを実行pInvoke.Invoke;
end ;end ;end ;end ;end .
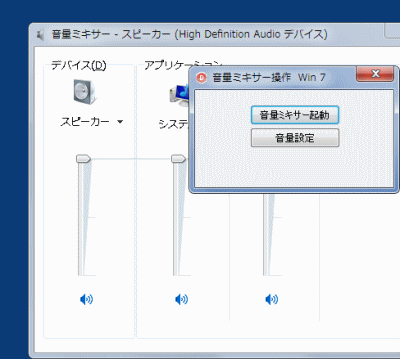
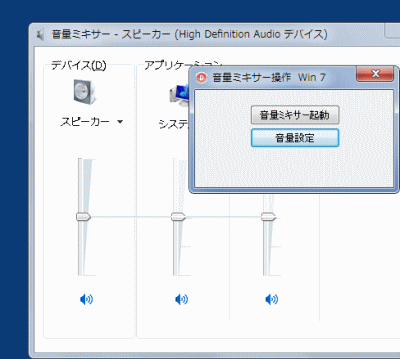
Windows 7 の [音量ミキサー] の設定ダイアログを起動して,スピーカーのボリュームの値を変更します.値が最大値に設定されている場合は,半分の値に,そうでない場合は,最大値に設定します.
図6
図7
リスト5
copy code
unit Unit1;interface uses Windows, Messages, SysUtils, Variants, Classes, Graphics, Controls, Forms,
Dialogs, ExtCtrls, StdCtrls, UIAutomationClient_TLB;
type TForm1 = class (TForm)
Button1: TButton;
Button2: TButton;
procedure FormCreate(Sender: TObject);procedure FormCloseQuery(Sender: TObject; var CanClose: Boolean);procedure Button1Click(Sender: TObject);procedure Button2Click(Sender: TObject);private { Private declarations } UIAuto : TCUIAutomation;
hTargetWnd : HWND;
public { Public declarations } end ;var Form1: TForm1;
implementation uses ActiveX, ShellAPI;{$R *.dfm} // =============================================================================// UIAutomationオブジェクトのインスタンスを生成// =============================================================================procedure TForm1.FormCreate(Sender: TObject);begin UIAuto := TCUIAutomation.Create(Self);
end ;// =============================================================================// [音量ミキサー]のダイアログを閉じる// =============================================================================procedure TForm1.FormCloseQuery(Sender: TObject; var CanClose: Boolean);begin SendMessage(hTargetWnd, WM_CLOSE, 0 , 0 );
end ;// =============================================================================// [音量ミキサー起動]ボタンクリック// Windows 7 専用// ShellExecuteの使用には,usesにShellAPIが必要// =============================================================================procedure TForm1.Button1Click(Sender: TObject);begin ShellExecute(Handle, nil , 'SndVol.exe' , nil , nil , SW_SHOW);
Sleep(1000 );
hTargetWnd := FindWindow('#32770' , nil );
end ;// =============================================================================// [音量設定]ボタンクリック// Windows 7 専用// TVariantArgの使用には,usesにActiveXが必要// =============================================================================procedure TForm1.Button2Click(Sender: TObject);var RootElement : IUIAutomationElement;
varProp : OleVariant;
Scope : TreeScope;
pCondition : IUIAutomationCondition;
found : IUIAutomationElement;
StrSearch : WideString;
iInter : IInterface;
pRangeVal : IUIAutomationRangeValuePattern;
CurrentValue : Double;
MaxValue : Double;
begin if hTargetWnd = 0 then exit;// ウィンドウハンドルからIUIAutomationElementオブジェクトを取得if UIAuto.ElementFromHandle(hTargetWnd, RootElement) = S_OK then begin // 検索条件設定// ControlTypeプロパティの値で検索// pConditionに検索条件のポインタが格納されるStrSearch := 'スライダー' ;
TVariantArg(varProp).vt := VT_BSTR;
TVariantArg(varProp).bstrVal := PWideChar(StrSearch);
UIAuto.CreatePropertyCondition(UIA_LocalizedControlTypePropertyId,
varProp,
pCondition);
// TreeScope_Subtreeは含めない// 含めると,他のスライダーが検索されてしまうScope := TreeScope_Element or TreeScope_Children;
// 検索実行RootElement.FindFirst(Scope, pCondition, found);
end ;// 要素のIUIAutomationRangeValuePatternインターフェイスを取得if Assigned(found) then begin found.GetCurrentPattern(UIA_RangeValuePatternId, iInter);
if Assigned(iInter) then begin if iInter.QueryInterface(IID_IUIAutomationRangeValuePattern,pRangeVal) = S_OK then begin
// ボリュームの設定可能な最大値と現在の設定値を取得 pRangeVal.Get_CurrentMaximum (MaxValue);
pRangeVal.Get_CurrentValue (CurrentValue);
// 設定可能な最大値と現在の設定値が同じなら半分の値に設定// それ以外は最大値に設定 if Round(MaxValue) = Round(CurrentValue) then begin pRangeVal.SetValue(MaxValue / 2.0 );
end else begin pRangeVal.SetValue(MaxValue);
end ;end ;end ;end ;end ;end .
06_ イベントハンドラ - エクセルの起動と終了を検出
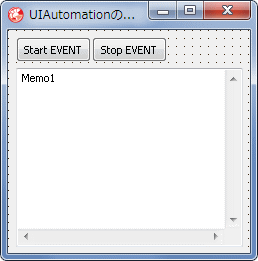
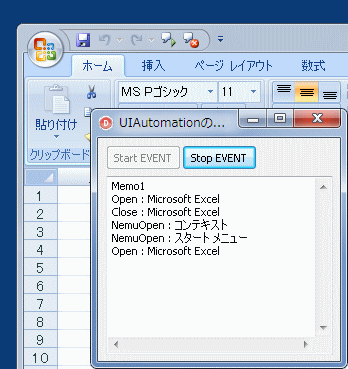
UIAutomation のイベントハンドラを使用して,アプリケーションの起動と終了を検出するサンプルプログラムです.ここでは,イベントの処理を開始してから,最初に起動したエクセルだけを対象としています.
UIAutomation のイベント処理は,処理するイベントに応じたインターフェイスを使用します.
(1) 検出するイベントに応じたインターフェイスを実装
(2) そのインターフェイスのインスタンスを生成
(3) 検出するイベントに応じた,イベント登録用関数を実行
(4) イベント検出用インターフェイスの関数内で,検出したイベントを処理
(5) 不要になったら,RemoveAllEventHandlers 関数等でイベントの登録を削除
という手順になります.実装したインターフェイスの関数は,自動で呼び出され,コールバック関数のような役割を行います.
図8
図9
copy code
unit Unit1;interface uses Windows, Messages, SysUtils, Variants, Classes, Graphics, Controls, Forms,
Dialogs, ExtCtrls, StdCtrls, UIAutomationClient_TLB, ActiveX;
type // イベント検出用のクラスの定義// HandleAutomationEventは継承元のIUIAutomationEventHandlerの関数TplUIEventHandler = class (TInterfacedObject, IUIAutomationEventHandler)
private function HandleAutomationEvent(const sender: IUIAutomationElement;eventId: SYSINT): HRESULT; stdcall ;
end ;TForm1 = class (TForm)
Button1: TButton;
Button2: TButton;
Memo1: TMemo;
procedure FormCreate(Sender: TObject);procedure FormCloseQuery(Sender: TObject; var CanClose: Boolean);procedure Button1Click(Sender: TObject);procedure Button2Click(Sender: TObject);private { Private declarations } UIAuto : TCUIAutomation;
RootElement : IUIAutomationElement;
EventHandler : TplUIEventHandler;
hTargetWnd : HWND;
public { Public declarations } end ;var Form1: TForm1;
implementation {$R *.dfm} // =============================================================================// フォーム作成時の処理// (1) UIAutomationオブジェクトのインスタンスを生成// (2) イベントハンドラー用のクラスのインスタンスを生成// =============================================================================procedure TForm1.FormCreate(Sender: TObject);begin UIAuto := TCUIAutomation.Create(Self);
EventHandler := TplUIEventHandler.Create;
RootElement := nil ;
hTargetWnd := 0 ;
Button1.Enabled := True;
Button2.Enabled := False;
end ;// =============================================================================// フォームを閉じる時の処理// =============================================================================procedure TForm1.FormCloseQuery(Sender: TObject; var CanClose: Boolean);begin UIAuto.RemoveAllEventHandlers;
end ;// =============================================================================// [Start EVENT]ボタン// 検出するイベントを設定// システムの状態によっては少し時間がかかることがある// // 本サンプルでは,全て,IUIAutomationEventHandlerインタフェイスを継承した// TplUIEventHandlerというクラスを実装して,そのメンバーの関数で検出// イベントごとにクラスを生成して検出してもよい// =============================================================================procedure TForm1.Button1Click(Sender: TObject);var Scope : TreeScope;
begin Button1.Enabled := False;
Screen.Cursor := crHourGlass;
// ここではデスクトップ直下のオブジェクトのみを対象とするので// GetRootElement関数でデスクトップのオブジェクトを取得if RootElement = nil then begin if UIAuto.GetRootElement(RootElement) <> S_OK then exit;end ;Scope := TreeScope_Subtree; // 直接の子オブジェクトのみを対象とするUIAuto.AddAutomationEventHandler(
UIA_Window_WindowOpenedEventId, // ウィンドウが開くイベントを検出RootElement, // 対象のエレメントScope, // スコープnil , // キャッシュは使用しないEventHandler); // イベント検出用クラスのインスタンスUIAuto.AddAutomationEventHandler(
UIA_Window_WindowClosedEventId, // ウィンドウが閉じる時のイベントを検出RootElement, // 対象のエレメントScope, // スコープnil , // キャッシュは使用しないEventHandler); // イベント検出用クラスのインスタンスUIAuto.AddAutomationEventHandler(
UIA_MenuOpenedEventId, // メニューが開く時のイベントを検出RootElement, // 対象のエレメントScope, // スコープnil , // キャッシュは使用しないEventHandler); // イベント検出用クラスのインスタンスButton1.Enabled := False;
Button2.Enabled := True;
Screen.Cursor := crDefault;
end ;// =============================================================================// [Stop EVENT]ボタン// イベントの検出を終了// =============================================================================procedure TForm1.Button2Click(Sender: TObject);begin Button2.Enabled := False;
UIAuto.RemoveAllEventHandlers;
RootElement := nil ;
Button1.Enabled := True;
Button2.Enabled := False;
end ;{ TplUIEventHandler } // -----------------------------------------------------------------------------// ウィンドウのクラス名を取得する関数// -----------------------------------------------------------------------------function GetClassNameStr(hWindow: HWND): String ;var Buffer : array [0 ..MAX_PATH-1 ] of Char;
Len : Integer;
begin System.FillChar(Buffer, SizeOf(Buffer), #0 );
Len := Windows.GetClassName(hWindow, Buffer, Length(Buffer));
if Len > 0 then Result := Buffer else Result := '' ;end ;// =============================================================================// イベントハンドラーのコード// // sender : イベントを発生した要素// eventId : イベント識別子// // UIA_Window_WindowClosedEventId識別子では,ウィンドウが閉じたことが検出され// るだけで,ハンドルやプロパティは取得できないことに注意// そこで,クラス名が取得できるかどうかで存在を確認している// =============================================================================function TplUIEventHandler.HandleAutomationEvent(const sender: IUIAutomationElement; eventId: SYSINT): HRESULT;var StrText : WideString;
begin // イベント識別子の値で処理を分岐case eventId of UIA_Window_WindowOpenedEventId:
begin // NativeWindowHandle値を取得して,クラス名で判定sender.Get_CurrentNativeWindowHandle(Pointer(Form1.hTargetWnd));
if GetClassNameStr(Form1.hTargetWnd) = 'XLMAIN' then begin Form1.Memo1.Lines.Add('Open : Microsoft Excel' );
end ;end ;UIA_Window_WindowClosedEventId:
begin if Form1.hTargetWnd <> 0 then begin if GetClassNameStr(Form1.hTargetWnd) = '' then begin Form1.Memo1.Lines.Add('Close : Microsoft Excel' );
Form1.hTargetWnd := 0 ;
end ;end ;end ;UIA_MenuOpenedEventId:
begin sender.Get_CurrentName(StrText);
Form1.Memo1.Lines.Add('NemuOpen : ' + StrText);
end ;end ;Result := S_OK;
end ;end .
イベントハンドラ (イベントハンドラー) 用のインターフェイスには,下表のようなものがあります.使用するインターフェイスは,表2 のイベントハンドラ登録用関数に,どれを使用するかによって異なります.
下のコードは,IUIAutomationEventHandler インターフェイスの宣言部の例です.このコードのように,継承元に TInterfacedObject を含めると,_AddRef,_Release,QueryInterface 等,基本的なメソッドを実装しなくて済むので便利です.
リスト7
copy code
// *********************************************************************// // インターフェイス: IUIAutomationEventHandler// フラグ: (256) OleAutomation// GUID: {146C3C17-F12E-4E22-8C27-F894B9B79C69}// *********************************************************************// IUIAutomationEventHandler = interface (IUnknown)
['{146C3C17-F12E-4E22-8C27-F894B9B79C69}' ]
function HandleAutomationEvent(const sender: IUIAutomationElement; eventId: SYSINT): HResult; stdcall ;
end ;
リスト8
copy code
TplUIEventHandler = class (TInterfacedObject, IUIAutomationEventHandler)
private function HandleAutomationEvent(const sender: IUIAutomationElement;eventId: SYSINT): HRESULT; stdcall ;
end ;
08_ イベントハンドラの登録用関数とイベントの識別子
イベントハンドラ (イベントハンドラー) 登録用の関数類です.
次の表は,イベントハンドラとして,上の表の AddAutomationEventHandler メソッドを使用する場合のイベントの識別子です.その他の関数,イベントハンドラ用のインターフェイスを使用する場合は,UIAutomationClient_TLB.pas 内の,先頭が UIA_ の定数値を参考にしてください.各定数の機能については,定数名から判断するか,以下のリンクの MSDN の記事を参考にします.
表3
UIA_AsyncContentLoadedEventId 非同期のコンテンツがロードされる時
UIA_AutomationFocusChangedEventId フォーカスが別の要素に移動した時
UIA_AutomationPropertyChangedEventId プロパティの値の変更時
UIA_Drag_DragStartEventId 要素をドラッグ開始した時
UIA_Drag_DragCancelEventId ドロップターゲット上で要素を削除する前に,ドラッグ操作を終了した時
UIA_Drag_DragCompleteEventId ドロップターゲット上の要素をドロップした時
UIA_DropTarget_DragEnterEventId ドロップターゲットの境界内に要素をドラッグした時
UIA_DropTarget_DragLeaveEventId ドロップターゲットの境界から要素をドラッグした時
UIA_DropTarget_DroppedEventId ドロップターゲット上の要素をドロップした時
UIA_HostedFragmentRootsInvalidatedEventId 不明
UIA_InputDiscardedEventId 指定された入力の廃棄または失敗時
UIA_InputReachedOtherElementEventId 指定された入力が,対象の要素以外の要素に達した時
UIA_InputReachedTargetEventId 指定されたマウスやキーボードの入力が対象の要素に達した時
UIA_Invoke_InvokedEventId コントロールが呼び出されるかアクティブになった時
UIA_LayoutInvalidatedEventId コントロール内の子項目のレイアウトの変更時
UIA_LiveRegionChangedEventId ライブリージョン内容の変更
UIA_MenuClosedEventId メニューが閉じた時
UIA_MenuModeEndEventId メニューモードの終了時
UIA_MenuModeStartEventId メニューモードの開始時
UIA_MenuOpenedEventId メニューが開かれた時
UIA_Selection_InvalidatedEventId コンテナ内の選択が大幅に変更されたときに発生
UIA_SelectionItem_ElementAddedToSelectionEventId 項目がコレクションに追加された時
UIA_SelectionItem_ElementRemovedFromSelectionEventId 選択項目の削除時
UIA_SelectionItem_ElementSelectedEventId selectionプロパティの変更時
UIA_StructureChangedEventId オブジェクトのツリー構造変更時のイベント
UIA_SystemAlertEventId システムアラート発行時
UIA_Text_TextChangedEventId テキストが変更される時
UIA_Text_TextSelectionChangedEventId テキストの選択変更時
UIA_ToolTipClosedEventId ツールチップが閉じられた時
UIA_ToolTipOpenedEventId ツールチップが開かれた時
UIA_Window_WindowClosedEventId ウィンドウが閉じられた時
UIA_Window_WindowOpenedEventId ウィンドウが開かれた時
09_ ツール類 - Inspect Objects ( Inspect.exe )
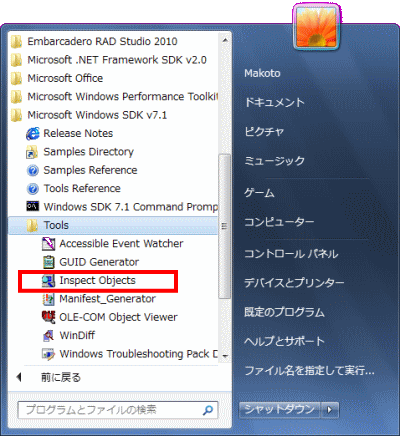
Microsoft Windows SDK 7.1 には,IAccessible, UI Automation 関係のツールが付属しています.
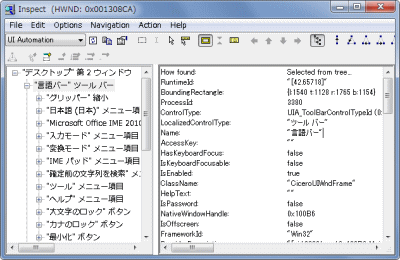
下の 2 つの図は,Inspect Objects です.実行ファイル名は Inspect.exe です.SDK 7.0 にも同名のツールが付属していますが,ウィンドウの階層表示の機能はありません.
このようなシステム関係の操作に関するツール類は,「管理者として実行」しないと,動作機能が制限されることがあります.
図10
図11
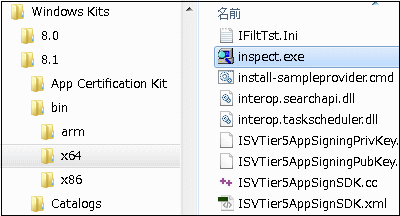
Windows SDK 8.1 にも同じツールが付属しています.
図12
Windows XP に Microsoft Windows SDK 7.1 をインストールして実行した場合,次のようなエラーが表示される時は,[Description of the Windows Automation API] のページから,Windows XP 用の更新プログラムをダウンロードしてインストールすると,解決するかも知れません.
図13 Windows XPでの起動時のエラー表示
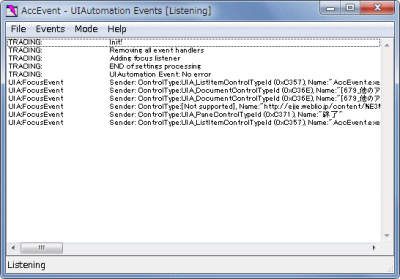
10_ ツール類 - Accessble Event Watcher ( AccEvent.exe )
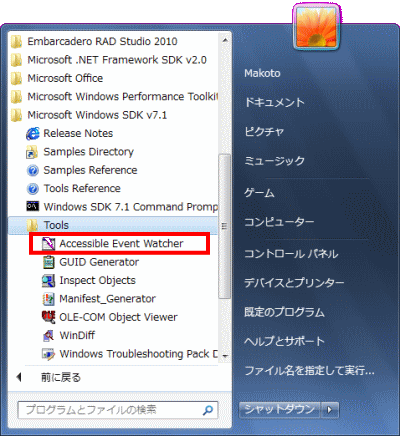
Microsoft Windows SDK 7.1 に付属の
Accessble Event Watcher の実行ファイル名は AccEvent.exe です.これも下図のように [スタート] メニューから起動できます.
図14
図15
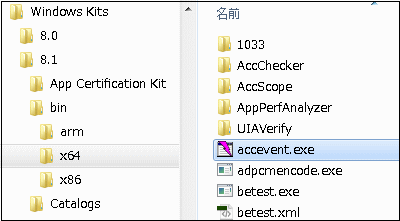
Windows SDK 8.1 にも同じツールが付属しています.
図16
11_ ツール類 - VisualUIAVerifyNative.exe
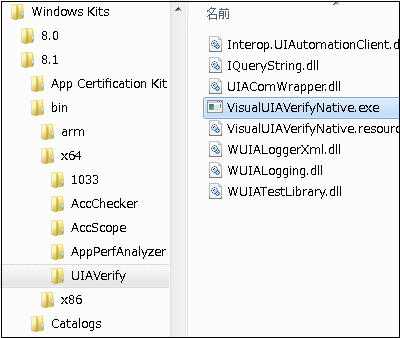
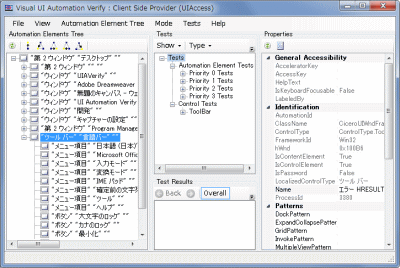
Windows SDK 8.1 には,上記以外にも UI Automation 関係ツールが付属しています.これらも [bin] フォルダ内にあります.下図はその 1 つです.
図17
図18
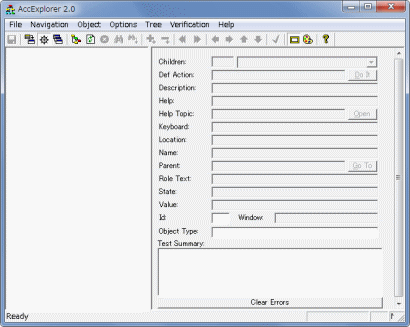
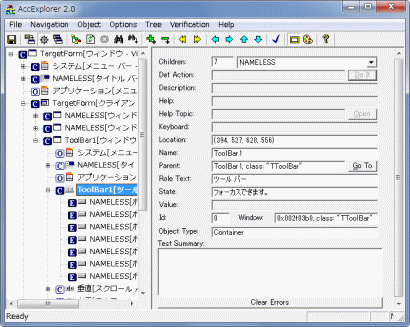
12_ ツール類 - Accessible Explorer ( AccExplorer32.exe ) 等
[Active Accessibility の UI サービス] の記事に,前述の Inspect Object の他に,テストツールとして [Accessible Explorer] というのがあります.これも
Inspect Object 同様,IAccessible インターフェイスを使用して,コントロール類の情報の取得や操作ができるようになっています.実行ファイル名は,AccExplorer32.exe です.
[備考 1]
図19
図20
[Options] から
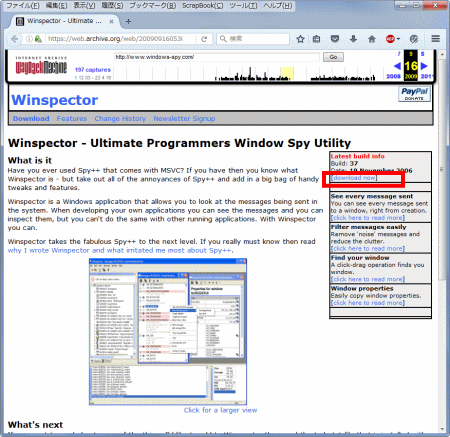
IAccessible, UI Automation インターフェイス関係のツールではありませんが,Winspector というツールがあります.
Delphi 7 までは,SPY++ と同じような機能を持つ WinSight というツールが付属していましたが,現在は付属していないようです.
図21
14_ ツール類の一括ダウンロード ( SPY++ を含む )
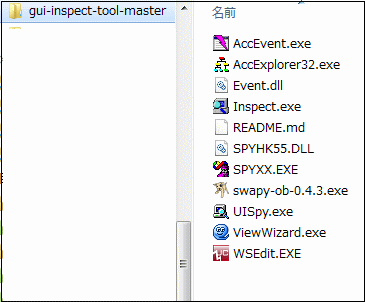
本ページで紹介したツール類の全てではありませんが,以下の GitHub から各種のツール類をまとめてダウンロードできます.現在,マイクロソフトが正式には提供していないツール類もあります.
図22
